We have a strict honest review policy, but please note that when you buy through our links, we may receive a commission. This is at no extra cost to you.

Canva vs Photoshop — which is better? In this comparison, I take an in-depth look at these two leading visual design tools, and help you pick the one that’s right for your business.
I’ll start off with a quick verdict, and then move on to a deeper dive.
Quick verdict
If you’re creating professional graphic design work that will be printed or shown at high resolution, Photoshop is usually the better option.
But if you need a multi-purpose design tool, the better choice is Canva. It has a very gentle learning curve and gives you access to a huge stock media library, video editing tools, presentation creation features, a basic website builder and more. And it’s extremely easy to use, making it a very good option for non-professional designers.
Getting started with Canva and Photoshop
I’ll start my full comparison with a key question: what are Canva and Photoshop?
What are Canva and Photoshop?
Canva and Adobe Photoshop are graphic design tools that let you create visual materials for a wide variety of uses. Both platforms can be used for creating online and printed material; photo editing; making videos; and even web design.
But there is a significant difference in the degree of technical editing that can be done within both tools.
Canva is aimed at users with little to no design training or experience — consequently, it is extremely easy to use and comes with a very gentle learning curve.
The tool provides a wide range of accessible features that help you create visual assets without too much fuss — templates, stock images and ultra-easy-to-use image editing tools.
The downside is that the design tools provided are on the basic side, and the scope for advanced graphic design work within the tool is fairly limited.
By contrast, Photoshop is a professional design tool that has been specifically designed for complex image editing and ‘serious’ graphic design work. It gives you a wide range of image manipulation features that allow you to tweak and edit every imaginable setting, right down to the individual pixels of your designs.
Unsurprisingly, this means that Adobe Photoshop is the much more technically powerful platform of the two, and its learning curve is significantly steeper than Canva’s — it can take months or even years to truly master the app.
Essentially, Canva is an easy-to-use multi-purpose design tool, while Photoshop — particularly when combined with some of its sibling apps in the Adobe ‘Creative Cloud’ suite — is probably best described as the ultimate image manipulation tool for visual professionals.
That’s not to say that ‘more powerful’ equates to ‘better’ for your needs however — we’ll dig into the contexts in which both products work best shortly.
But first, a quick look at the history of both tools.
Canva and Photoshop: history and userbases
Photoshop was originally developed in Michigan way back in 1987, and it is now arguably the most well-known product of its parent company, Adobe.
Adobe is one of the ten biggest software companies in the world, supported by a staff of over 30,000 people.
Photoshop is just one of the 20+ apps available in Adobe’s flagship product suite — Adobe Creative Cloud — which includes other well-known tools such as Illustrator and After Effects. Creative Cloud has over 37 million paying users.
Canva, which was launched in 2013 by Australian technology entrepreneur Melanie Perkins, recently exceeded 260 million monthly active users in over 190 countries. In excess of 30 billion designs have been created with the tool and more than 5,000 staff members now work for the company.
But how do both these tools work?
How do Canva and Photoshop work?
Canva and Photoshop work in quite different ways.
Canva is primarily designed to be used in a web browser such as Safari, Google Chrome or Microsoft Edge. This means that all the processing of your designs takes place ‘in the cloud’ and you don’t need a particularly powerful (or expensive!) computer to use the tool.
(A downloadable Canva desktop app is available for Mac and PC, but this still requires an Internet connection for you to avail of the vast majority of the platform’s assets — templates, stock media etc.).
By contrast, Photoshop is a desktop application that you download and install on your own computer. All processing is done locally, and you don’t need to be connected to the Internet to make the most of the application.
(A basic version of Photoshop for browsers — appropriately named ‘Photoshop for Web’ — is now generally available, but this is missing many of the more powerful image manipulation features of the desktop version.)
It’s important to note that for Photoshop to function properly, you’ll need a decent Mac, PC or iPad with a reasonable amount of RAM — ideally 16GB+ — and the performance that you’ll get out of Photoshop will depend heavily on the quality of your computer’s graphics card.
By contrast, you can use Canva on a fairly basic device — even a fairly ordinary Chromebook will do the job.
Despite the different approaches to how they work, Canva and Adobe are both ‘software as a service’ (SaaS) tools. You cannot buy either tool outright or actually own a copy yourself — instead, you pay a monthly or annual fee for access to the software.
And speaking of fees…
Canva pricing vs Photoshop pricing
Canva pricing
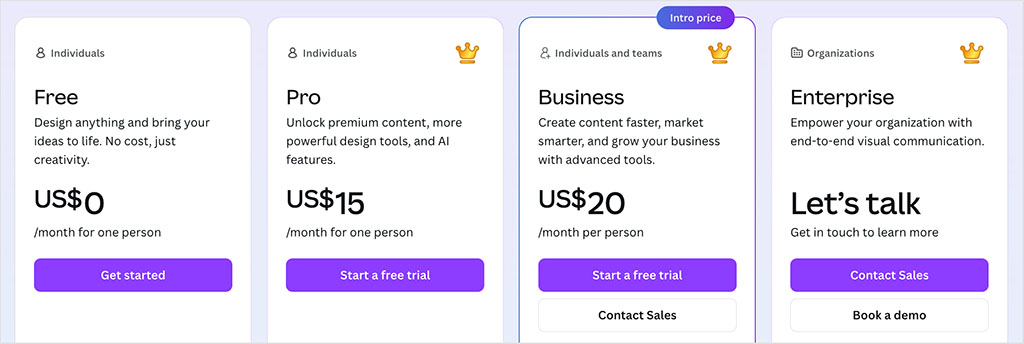
There are four Canva pricing plans available:
- Canva Free — $0 per month
- Canva Pro — $15 per month (for one user)
- Canva Business — $20 per month per user
- Canva Enterprise — Custom pricing depending on requirements
If you pay annually for a ‘Canva Pro’ or ‘Canva Business’ plan, you receive a 16% discount on the above fees.
As for the key differences in features between Canva’s plans, some of the main ones to watch out for are:
- Seats — Canva only lets you add more than one user on its ‘Canva Business’ and ‘Canva Enterprise’ plans.
- Templates and free media assets — Canva’s paid plans come with significantly more templates and royalty-free images, videos and audio than the free one.
- AI-powered design tools — these are only fully accessible on paid Canva plans
- Brand kits — you can create 1 on the free plan, up to 5 on ‘Canva Pro,’ 100 on ‘Canva for Business,’ and as many as 1,000 on ‘Canva Enterprise,’ which also provides the most advanced brand controls.
- Storage — the free plan gives you 5GB, ‘Canva Pro’ provides 100GB, ‘Canva Business’ increases this to 500GB, and ‘Canva Enterprise’ offers 1TB per user.
(You can read our Canva pricing and Canva Pro vs Free articles for more details on the key differences between Canva plans).
As mentioned above, there is a free version of Canva available, which gives you cut-down access to the tool — there are less templates and stock images available in this, and the output formats it gives you are limited. But even so, the free version is extremely usable — you can definitely create very usable content and designs with it.
Note: if you want to try out the more advanced features of Canva, there’s a way to do this for free too, via Canva’s free trial of its ‘Pro’ version.
Photoshop pricing
Pricing for Photoshop varies depending on whether you are a private individual or a business user.
The available pricing options are:
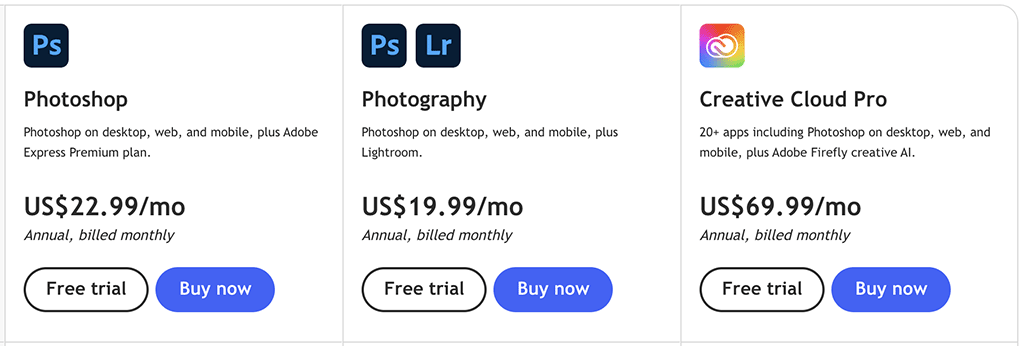
Individual users
- Photography plan — $19.99 per month. In addition to the full version of Photoshop, this plan includes Adobe’s Lightroom, Lightroom Classic and Photoshop Express apps. It also provides 1TB of cloud storage.
- Photoshop plan — $22.99 per month. This plan includes Adobe Fresco, Photoshop Express, and Adobe Express in addition to 100GB of cloud storage.
- Creative Cloud All Apps Plan — $69.99 per month for an annual plan. This plan includes 25 other professional apps in addition to Photoshop, including Adobe Illustrator, After Effects, InDesign and Adobe XD. You get 100GB of cloud storage on this plan.
Business users
- Photoshop for teams — $37.99 per month per license. This plan includes Adobe Fresco, Adobe Express, Premiere Rush and Photoshop Express. It also provides 1TB of cloud storage.
- Adobe Creative Cloud All Apps for teams — $99.99 per month per license. This includes the full suite of professional apps along with 1TB of cloud storage.
A 7-day free trial of Photoshop is available to help you work out whether it’s the right product for your needs.
Now, as you can see, Photoshop is often bundled with various other Adobe apps, so the right plan for you will probably depend on what other Adobe products you would like to get your hands on.
If your focus is exclusively on photography and general image editing, then the $19.99 ‘Photography plan’ is a good place to start, as it lets you enhance your images with Lightroom and then integrate them easily into your Photoshop projects.
However, if you are a professional visual creative — or have aspirations to be one — it’s hard to argue against getting your hands on Photoshop via a Creative Cloud ‘All Apps’ package.
So which is cheaper, Canva or Photoshop?
In terms of which product works out cheaper, Canva is a clear winner in a Canva vs Photoshop pricing shootout.
For a start, there’s a very usable, free version of Canva available — the best you can do on this front with Photoshop is access a 7-day free trial.
If you’re an individual user and you prefer to pay monthly, a $15 per month ‘Canva Pro’ subscription comes in $5 per month cheaper than Photoshop’s cheapest plan (the $19.99 per month ‘Photography’ plan).
For businesses that need to give multiple users access to a design tool, the pricing difference between Canva and Photoshop is even more pronounced.
At $20 per user per month, the ‘Canva Business’ plan works out around $18-$70 per month cheaper than providing your team members access to Photoshop via a standalone subscription or a Creative Cloud plan.
Pricing, of course, isn’t everything. How easy are both tools to use?
Interface and ease-of-use
The Canva interface
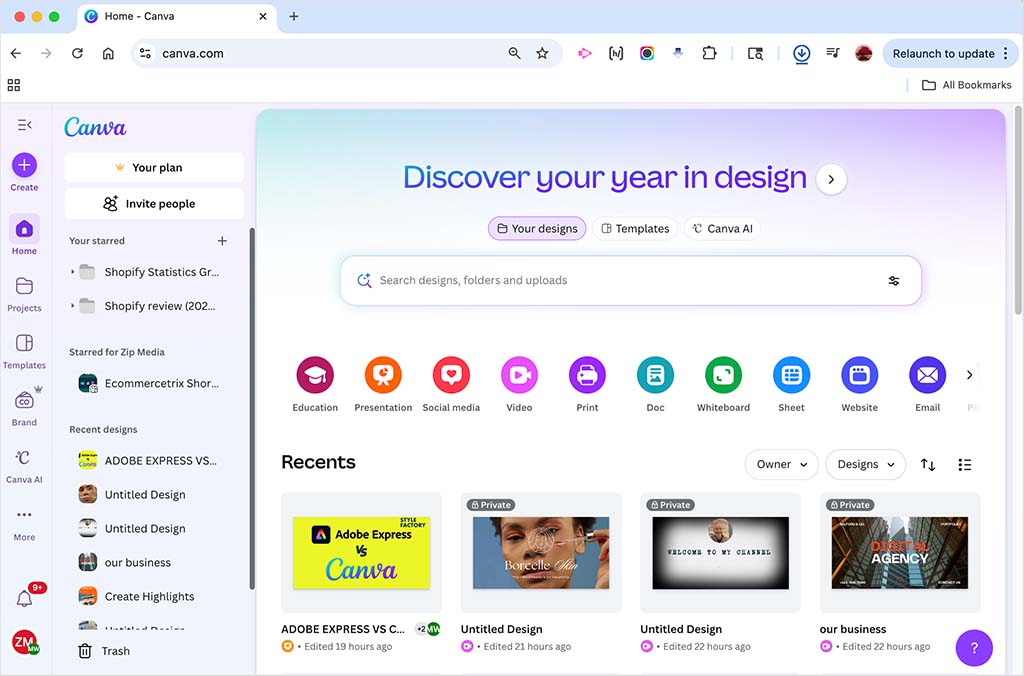
Canva makes it really easy to create a new design. When you log in, you simply enter the type of project you want to work on (infographic, social media graphics, video etc.) into a search box at the top of the screen. You’ll then be taken to a page with a large selection of relevant templates to use as a starting point for it.
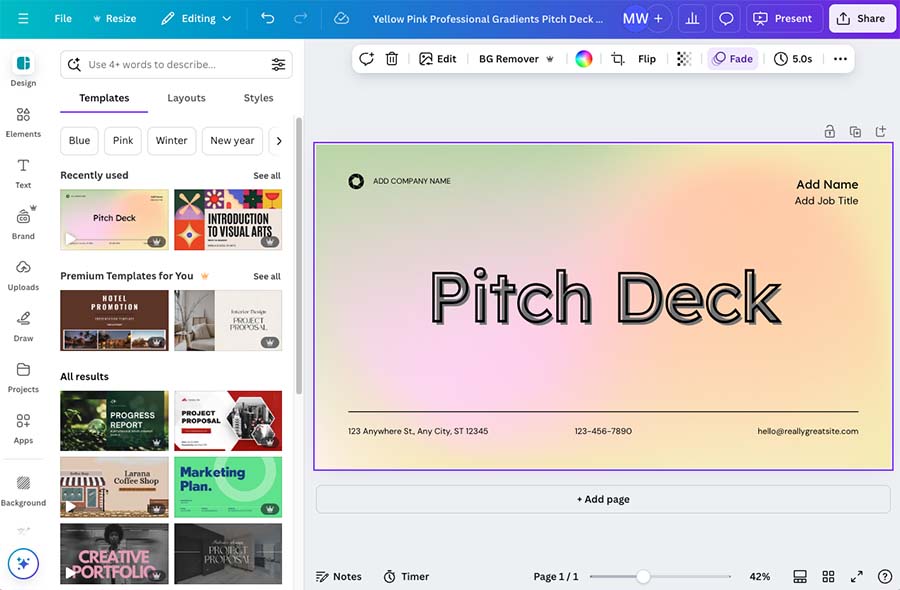
Once you’ve started work on a design, you’ll encounter a screen comprising two sections: a main menu on the left where you can access visual elements and stock photography, and a drag and drop editor on the right (see screenshot below).
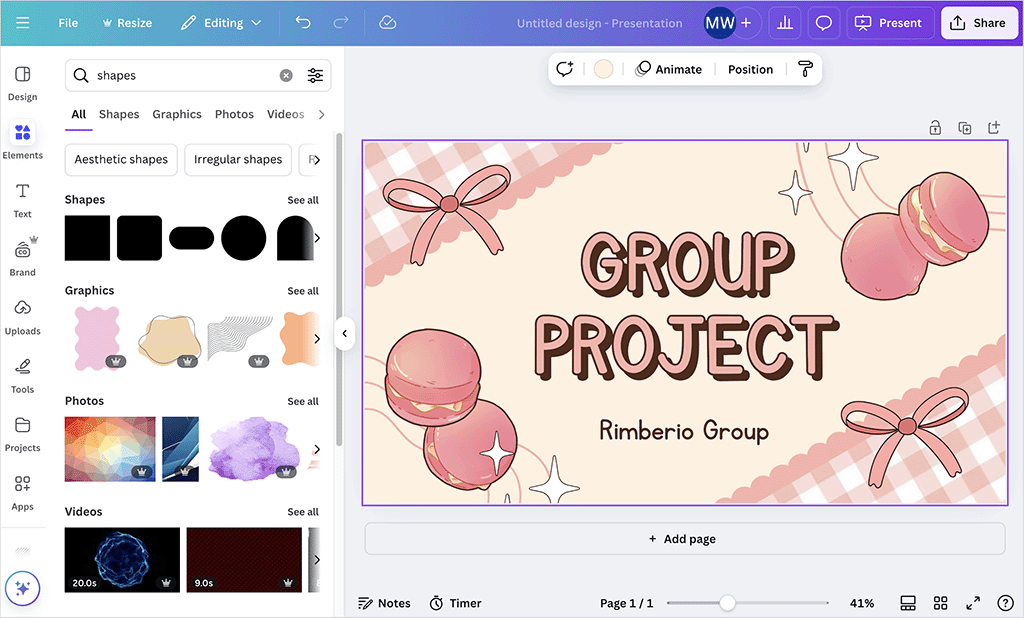
The left-hand menu provides a wide range of options for adding elements to your design. These include:
- graphic elements (shapes, icons, outlines etc.)
- photos
- videos
- text
- animations
- assets you’ve uploaded
- brand colors.
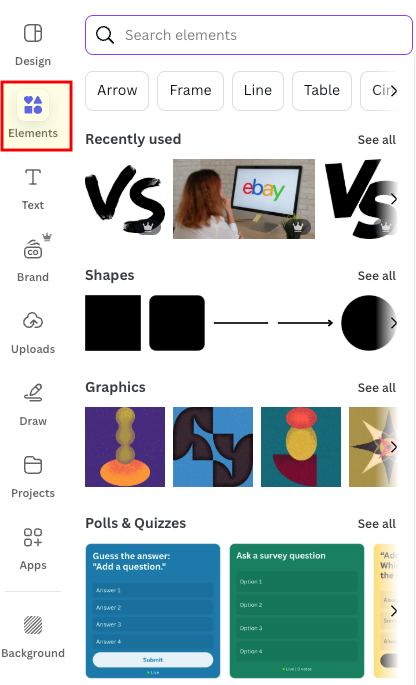
Within this menu, there is one section that is of particular importance: the ‘Elements’ tab. When you click on this, you can search the full range of Canva’s multimedia items and stock imagery — this makes it extremely easy to find the right assets and add them to your project.
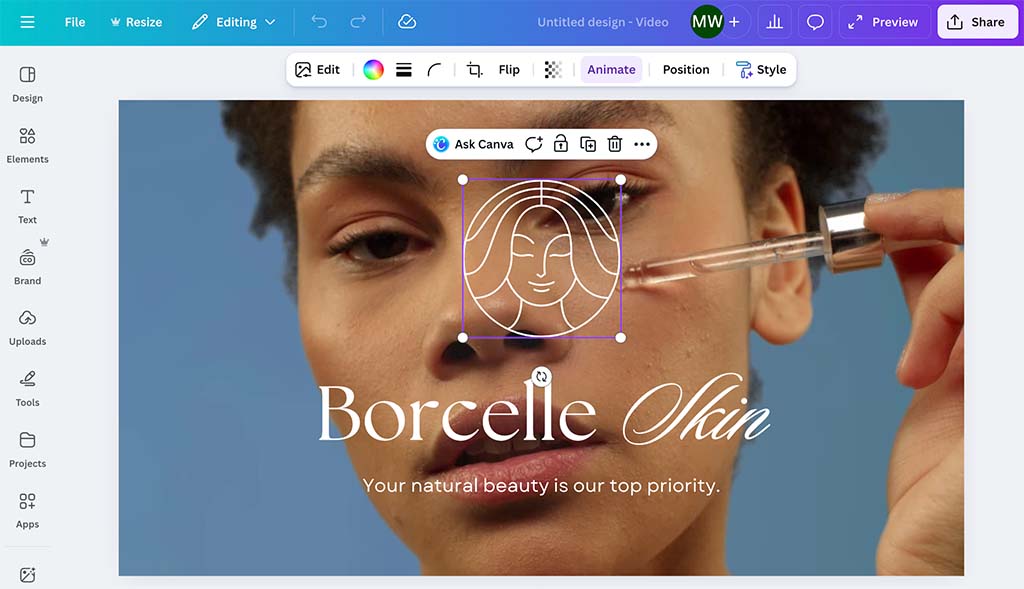
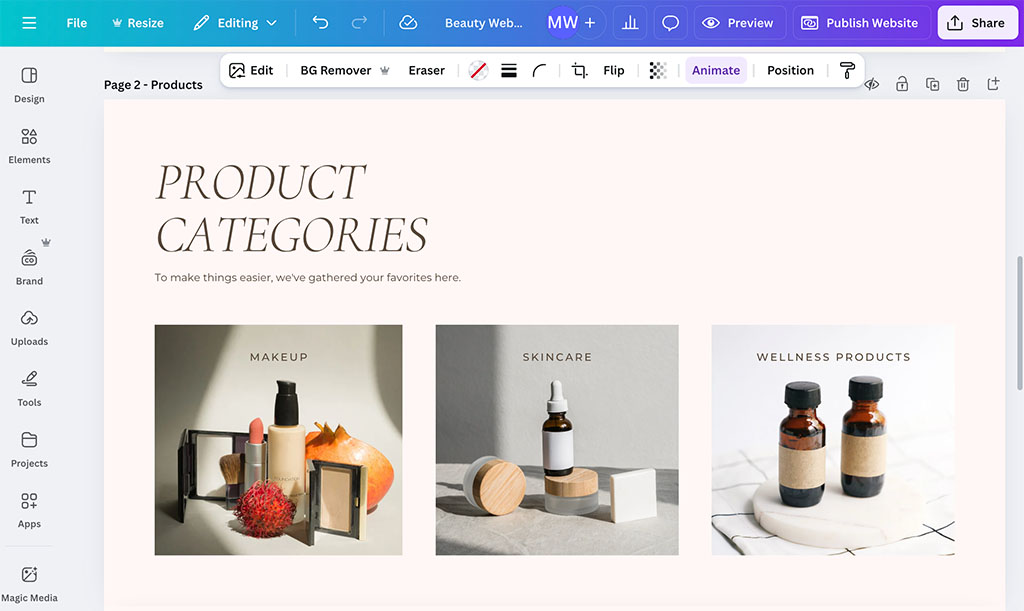
When it comes to adjusting your design, using Canva’s drag-and-drop editor is very straightforward to use too. You simply click on an element, and you can then change its position, size or rotation by using your mouse to adjust the controls provided.
Changing colors and applying effects is equally simple — once you’ve clicked on an element in your design, you can access a range of styling options at the top of the interface (see screenshot below).
All in all, Canva’s interface is extremely intuitive and comes with little to no learning curve. As long as you have basic computer skills or experience of software like Microsoft Word or PowerPoint, you’ll be able to produce a design in Canva within a matter of minutes.
But how does all this compare with using Photoshop?
The Photoshop interface
Creating a new project in Photoshop isn’t particularly difficult — you simply go to a File > New option to access a ‘new document’ window. You can then choose one of Photoshop’s preset document formats as the basis for your project or simply set a custom size for it.
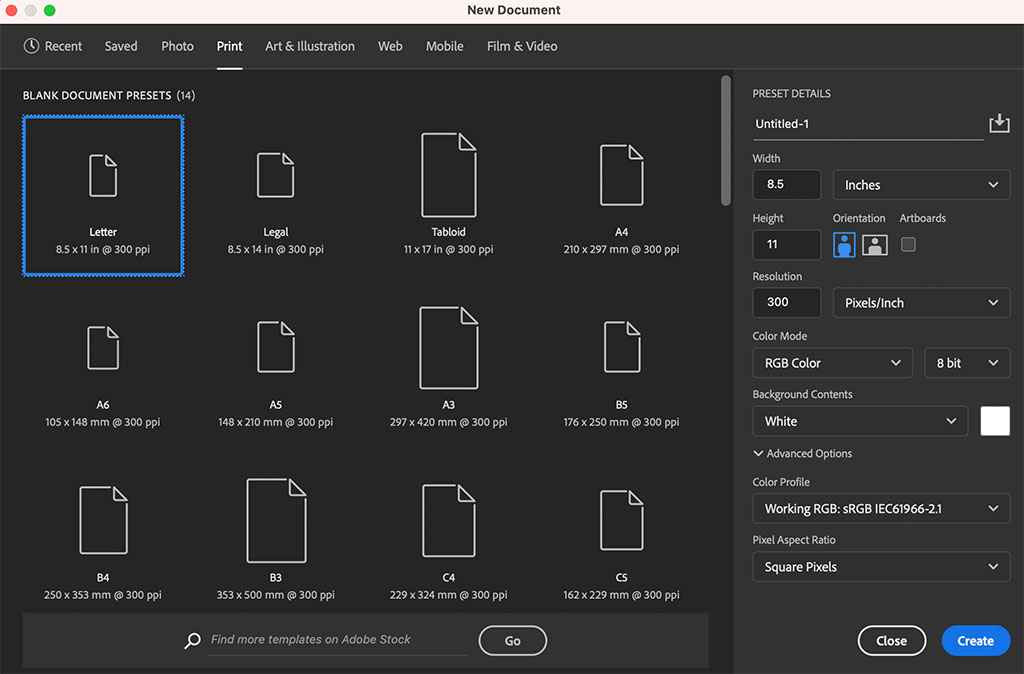
However, the range of detailed settings available to you at this point highlights Photoshop’s position as the most popular professional design tool in use today — and immediately lets you know that Photoshop’s user interface is quite a different beast to Canva’s beginner-friendly one.
For example, when creating a Photoshop project, you can choose to specify:
- your document’s ‘color mode‘ and ‘color profile‘ (RGB, CMYK etc.)
- your design’s resolution — the number of pixels per square inch on your document
- ‘bit depth‘ — the amount of color information available for each pixel in an image
- the unit of measurement for your document — pixels, inches, centimeters, millimeters, points or picas.
These technical options — although ideal for professional graphic designers working on commercial projects — will probably be a bit intimidating to a newbie designer.
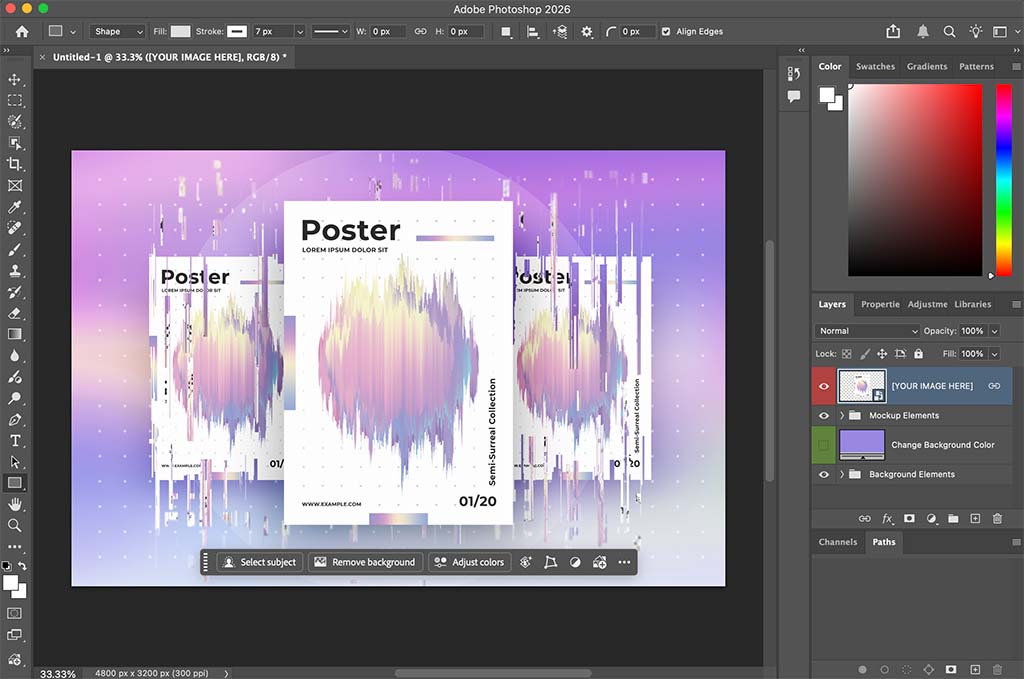
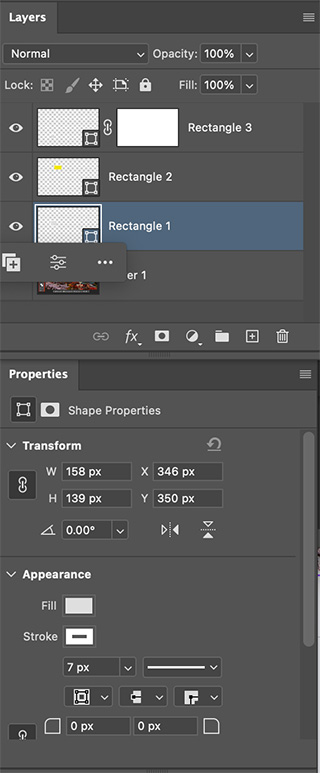
Now, once you start working on your document in Photoshop, you’ll see your design housed in a large canvas covering most of the screen, with the most commonly used Photoshop tools displayed in an icon menu on the left-hand side.
The top of the interface features a range of settings which change depending on the specific tool in use, and the right-hand side of the interface gives you access to your document’s layer controls, image adjustment tools and a host of other Photoshop features.
Given the massive amount of editing capability within Photoshop, its interface is very well constructed. There are menus nestled within the system that activate automatically depending on the tools you are using.
Additionally, many of the control panels in Photoshop are ‘detachable’, so you can move them around the interface to suit your preferred placement.
You also have the option to choose different ‘workspaces’ to suit the specific design task at hand — 3D, motion, painting, photography and graphics workspaces are all available.
Alternatively, you can create a custom workspace and pick and choose the tools you would like to have easy access to.
While the range of interface options may feel rather daunting to a beginner, there are several features within Photoshop to help newbies get to grips with the features.
For example, hovering over any of the tool icons brings up a quick introduction to each one, along with links to helpful tutorials and explainer material.
That said, there is just such a wealth of editing features in Photoshop that beginners will be best served by spending quite a lot of time going through Adobe’s detailed Photoshop educational materials (such as the ‘Photoshop Basics‘ course). These are available for free in the Adobe help center.
Overall, when it comes to ease-of-use, Canva wins. This is of course because technically speaking, it is a much less sophisticated platform than Photoshop — but the tool enables anyone with basic IT skills to produce a respectable looking design in just a few minutes.
And speaking of creating designs, let’s explore how both tools let you do just that — starting with templates.
Templates
One of the biggest differences between Canva and Photoshop involves their approaches to using templates in your designs.
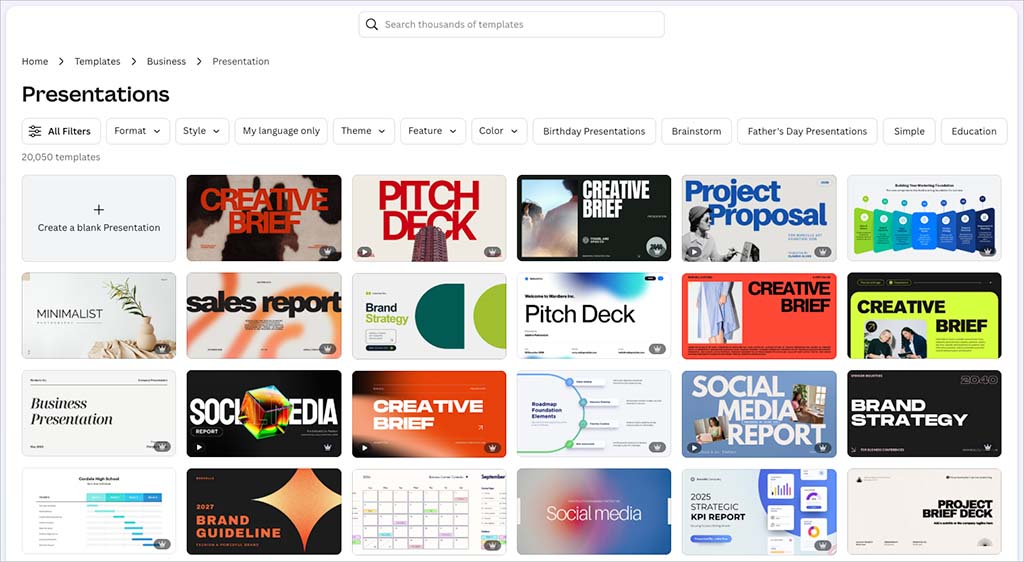
Canva provides an enormous number of templates on all plans — the free plan gives you 1.6+ million of them, and paid Canva plans provide a remarkable 3.6+ million to choose from.
All these templates are immediately accessible within the Canva interface, and applying one to a project can be done in a couple of seconds.

And Canva’s template library is extremely well organized. It features a handy set of category filters that help you select a template based on business need, color palette or style (minimalist, bold, luxury etc.).
By contrast, Photoshop contains barely any ready-made design templates out of the box.
There is a small range of around 1,000 or so free Photoshop templates in the ‘Adobe Stock’ library — but this is no match for the number on offer from Canva.
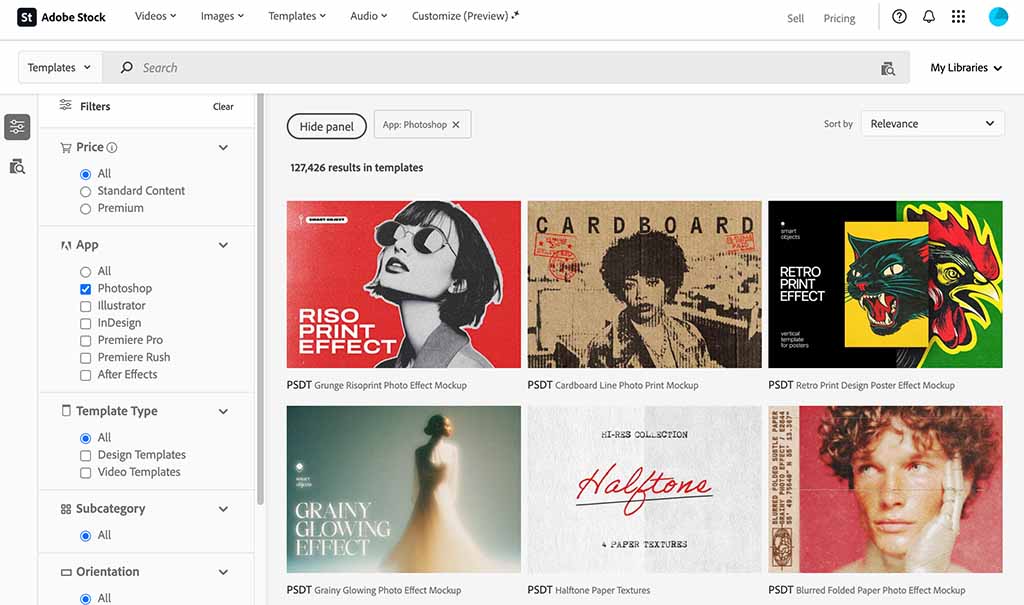
There are also 120,000+ premium Photoshop templates available in Adobe Stock but using these is expensive — a single template can set you back several hundred dollars.
And, while it is possible to access Adobe Stock templates from within Photoshop, this involves a fairly laborious process of downloading the template from the Adobe Stock website to your ‘Creative Cloud Library’ before you can use it in Photoshop.
Ultimately when it comes to availability, ease-of-use and price, Canva is the definite winner in a template head-to-head.
Try Canva Pro for free – for 30 days
Canva are currently making a 30-day free trial of Canva Pro available to Style Factory readers. This gives you full access to all the Canva Pro features and assets for several weeks, and lets you export all your designs too. Please note that this offer may be available for a limited period only.
Stock photography
As with templates, Canva and Photoshop differ significantly when it comes to the availability and price of stock photos to use in your designs.

A Canva subscription gives you access to a huge library of stock photos and other multimedia assets (graphics, videos and audio) — over 4.7 million assets are included with the free plan, and 141+ million are available on a paid-for plan.
And — as with the design templates discussed above — the library for accessing these stock resources in Canva is fully integrated into the tool’s interface, making it really quick and easy to find an appropriate stock image and pop it into your design.
By contrast, Photoshop doesn’t provide you with any stock photos as part of your subscription.
Now, it’s probably fair to assume that many Photoshop users — professional graphic designers, visual artists and so on — often use the tool to work on designs involving original photography taken specifically for a project, and such users may not be that bothered by the absence of royalty-free stock images.
And Photoshop users that do need to use stock images have a few options available. They could source free images from websites like Pexels or Unsplash, or pay for an image from a premium stock photography company like Getty or Shutterstock — or indeed Adobe, via its own premium stock asset library, ‘Adobe Stock.’
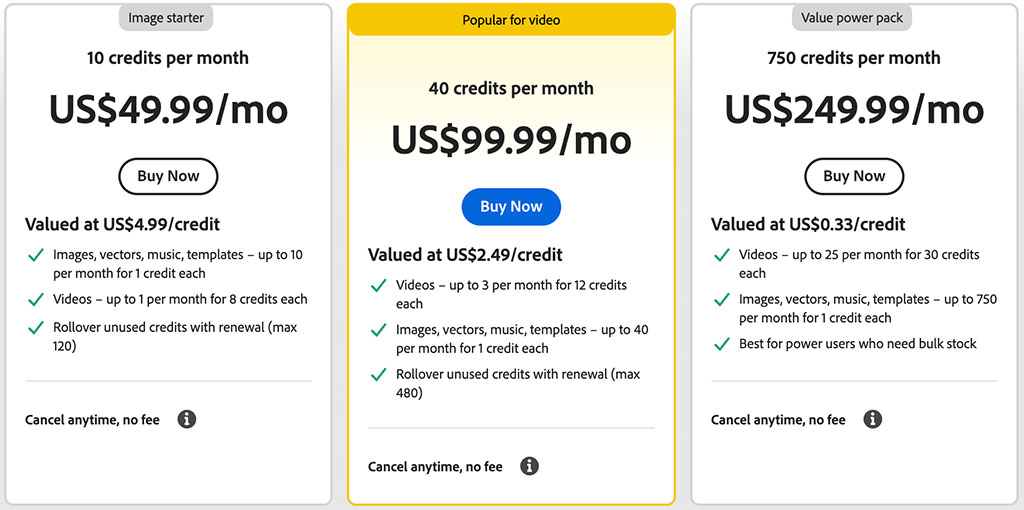
Adobe Stock now contains over 835 million assets (photos, vectors, illustrations, and more). But its pricing can work out expensive, because plans limit you to a set number of downloads per month. For example, a $49.99 subscription only gives you 10 standard assets monthly — which can feel poor value when you consider that this costs several times more than a Canva Pro subscription, which lets you download unlimited assets.
Additionally, the licensing arrangements governing what you can do with an Adobe Stock image can be very restrictive.
There are rules on how you can use images from Canva’s stock photo library too, but these are more relaxed than Adobe’s.
So, if you want access to royalty-free stock images to incorporate into your designs, Canva is the obvious choice over Photoshop.
(In fact, even if you end up choosing Photoshop as your image editor, there’s an argument to be made for using Canva simply as a source of stock imagery — it’s much cheaper than subscribing to dedicated image libraries).
Now, let’s take a look at using Canva and Photoshop for repurposing and resizing your designs.
Repurposing your designs
These days, repurposing designs for use across many different platforms is extremely common. A single design may need to be reformatted and resized to suit a whole range of different social media channels — each with its own format and ratio requirements — or used as the basis for lots of physical items (printed posters, flyers and so on).
In Photoshop, repurposing artwork for different use cases and aspect ratios usually involves a fair bit of work.
Although the tool provides all sorts of controls for cropping and exporting your design, it doesn’t provide a simple way to reformat one piece of artwork into multiple formats and sizes.
Additionally, when you use Photoshop’s crop tool to resize the overall aspect ratio of a design, you still need to manually resize and reposition every element within your artwork — all of which takes considerable time to do — to make it work for that ratio.
In Canva, by contrast, repurposing designs across lots of output formats involves a really smooth (and speedy) process: you can use Canva’s nifty ‘Resize’ feature, which is available on all paid Canva plans.
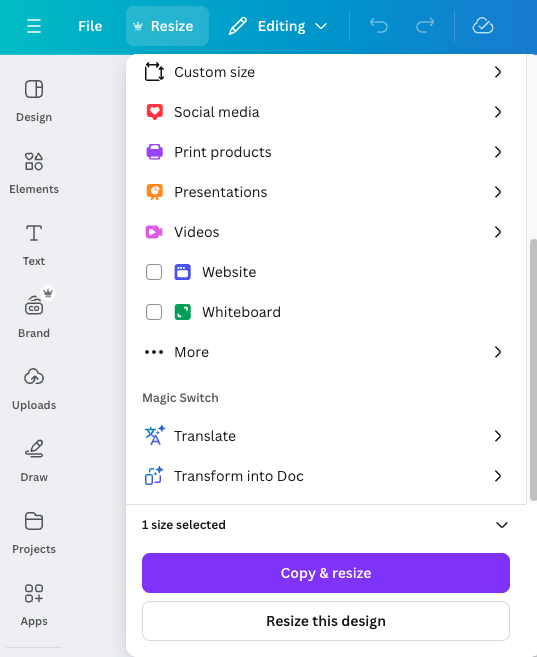
With this tool, you simply open your design, click the ‘Resize’ tool, then select as many different output formats that you need to resize your designs to.
Not only does this create multiple versions of your artwork, all set to the appropriate dimensions, but it also ‘intelligently’ resizes and scales text and images within your design — meaning there is usually very little manual editing to do on each new variant of your work (if any).
(Canva’s ‘Resize’ tool also features a ‘Magic Switch’ feature that includes a handy translation tool for creating different language versions of your designs.)
While Photoshop’s AI tools can assist with extending or modifying images, it still lacks a true one-click, multi-format resizing workflow comparable to Canva’s Resize feature.
So, all in all, when it comes to repurposing designs, the winner is Canva.
Note: Photoshop’s sister app, Adobe Express, has a similar resize feature to Canva’s Magic Switch tool — you can learn more about this in our detailed Canva versus Adobe Express comparison.
Photo editing
It should be no surprise that Photoshop is the winner over Canva when it comes to photo editing capabilities — there is very little you can’t do to a photo in Photoshop!

Here are just a few of the photo editing tasks you can perform in Photoshop that you can’t with Canva:
- process RAW files (unprocessed photo files that contain large amounts of data and allow for non-destructive editing of images)
- apply ‘dodge’ and ‘burn’ effects to parts of a photo — these effects allows you to lighten (‘dodge’) or darken (‘burn’) parts of an image
- use layer masks — these let you hide different portions of an individual photographic layer to reveal parts of other layers in your design
- use adjustment layers — these let you apply different effects like color and tonal changes to your image without permanently changing your image’s pixel values
- image stacking — this editing technique, frequently used in product photography, involves placing different versions of the same image on top of each other in order to create a composite file of your image that eliminates any imperfections in your original one.
- image warping — this lets you manipulate the shape and plane of whole images or objects and shapes within your image.
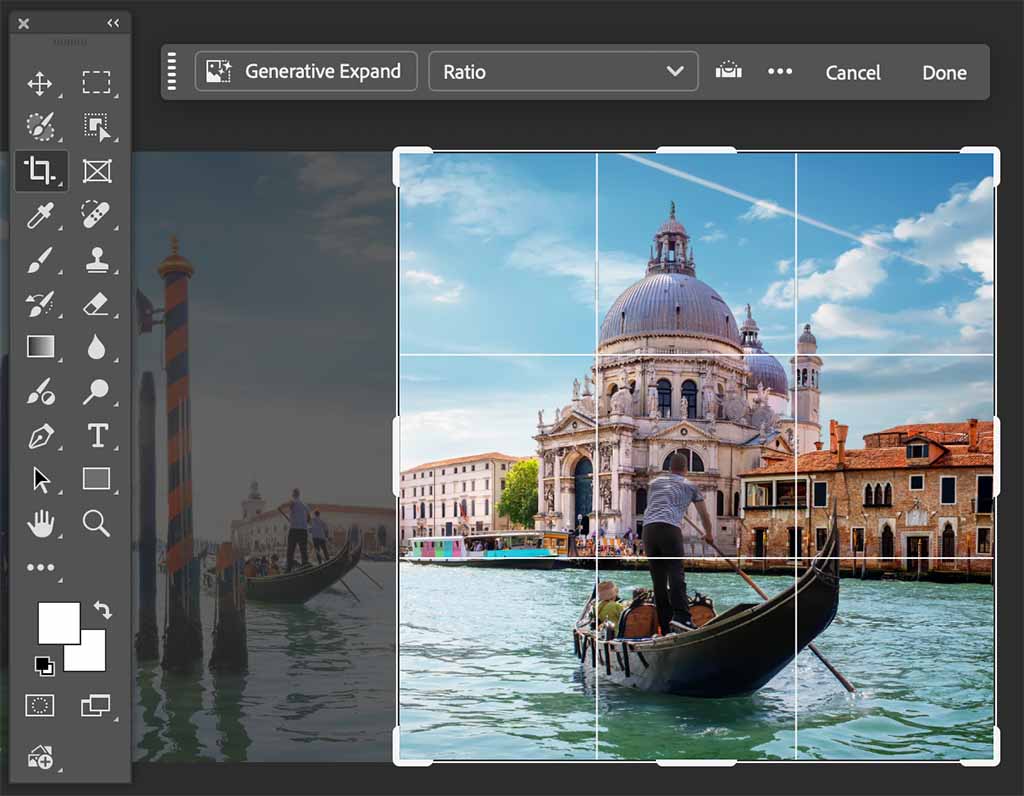
Recent Photoshop updates have further strengthened this advantage, introducing AI-powered features such as Generative Fill, Generative Expand, Generative Upscale, and Harmonize, which automate complex edits like object replacement, canvas expansion, resolution enhancement, and realistic compositing.
And this list just scratches the surface of what you can do to photos in Photoshop.
But, of course, not every designer needs access to this level of photo editing ammunition.
So, how does Canva fare when it comes to photo editing?
In essence, it covers the basics well.
To edit a photo in Canva design, you click on the ‘edit image’ button at the top of the Canva interface.
This brings up a handy set of photo editing controls for adjusting brightness and contrast; applying photo filters; and adding shadows. Several other easy-to-use effects tools are also accessible here.

(Canva also recently introduced a standalone image editor — the ‘modal photo editor’ — that allows you to edit your photos before adding them to a design.)
While the photo-editing options in Canva are far more modest than those in Photoshop, they cover enough bases to allow novice designers and small businesses to produce impressive-looking images.
Let’s turn now to another photo-editing task: removing backgrounds from images.
Background removal
Both Canva and Photoshop give you excellent background removal tools: you just hit the ‘Background remover’ (Canva) or the ‘remove background’ (Photoshop) buttons to isolate your subject from the background of a photo.
These tools are particularly handy for creating professional profile headshots or attractive product shots for ecommerce listings.

Both tools perform background removal tasks extremely well and very quickly; however in my tests, Photoshop removed backgrounds almost instantaneously, while Canva took a few seconds to get the job done.
(This is hardly surprising really, given that Photoshop can harness the power of your computer to process images, while Canva has to talk to a remote online server to do so).
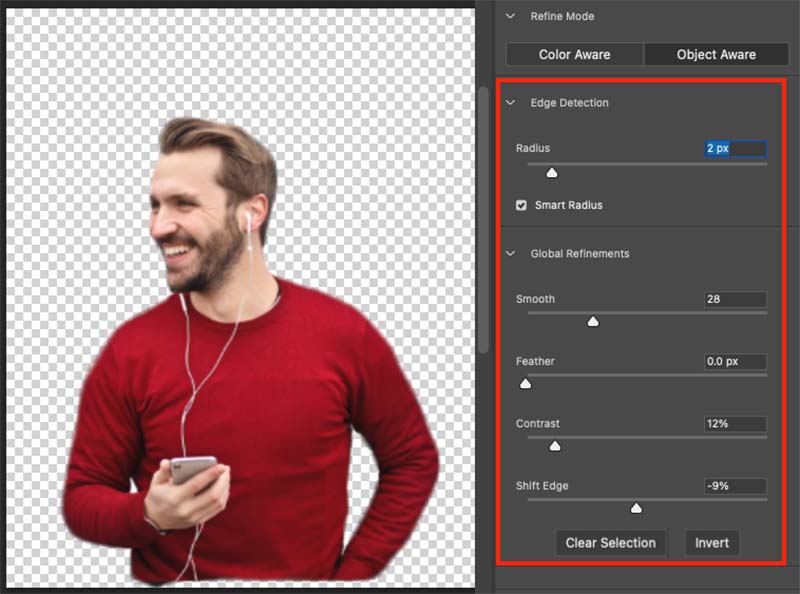
When it comes to fine-tuning your images once you’ve removed the background, Photoshop offers a much wider range of options than Canva.
Although Canva lets you add some background back in to your cut-out via a restore brush tool, Photoshop gives you a much larger range of tools for making very detailed adjustments, via its ‘select and mask’ settings. These allow you to smooth, feather and shift the edge of your cut-out with a huge degree of precision.
(Canva does have one edge over Photoshop here though: while Photoshop’s background removal tool works only with images, Canva’s works with videos too.)
Ultimately, both tools are great for removing backgrounds, but Photoshop’s editing capabilities are particularly good for graphic designers that need to produce image cut-outs for use in high-end commercial contexts.
Of course, it is sometimes necessary to remove other items from your photos — not just backgrounds. You might need to get rid of an unwanted object or a particular person, for example.
This isn’t easily doable in Canva, but Photoshop offers plenty of editing features for tasks like this. Of particular note here is Photoshop’s ‘content aware fill’ tool, which lets you select unwanted objects in your photo and replace them by automatically ‘filling in’ the background.
As with image processing in general, it’s a win for Photoshop in the background removal department.
But what about text?
Fonts and typography
Whether you’re designing for yourself, your brand, or someone else’s business, working with text and typography is an essential part of the process.
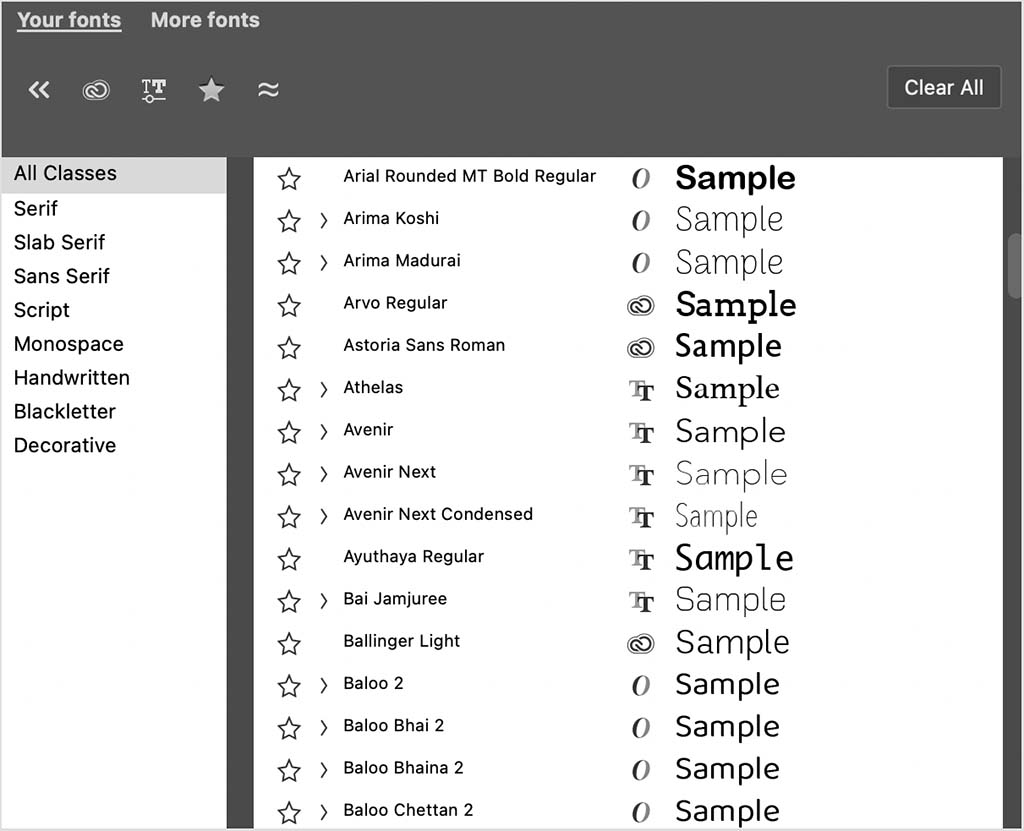
And Photoshop gives you a significantly bigger range of fonts to play with — subscribers get access to the full set of 30,000+ fonts in the Adobe Fonts library. By contrast, you get access to around 3,000 fonts in Canva.
In Canva, once you’ve selected a font for your text, you can apply 9 simple text effects to it. Common effects like drop shadow, curved text, outline and hollow are all catered for.
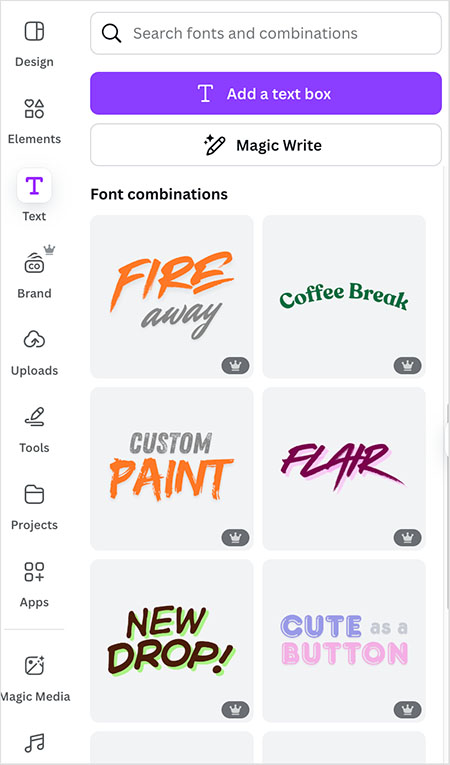
Canva also helps its non-professional userbase by providing a large range of font-pairing combinations; this lets relatively-inexperienced designers combine different fonts, safe in the knowledge that they are using font pairings that work well together.
With Photoshop, typography styling options are considerably more extensive than in Canva— you can apply hundreds of Photoshop effects to pieces of text in your design.
One thing to note however is that in order to apply many of these effects to your text, you may need to first convert it to pixels using a process called ‘rasterizing.’ Once you’ve done this, you won’t be able to edit your text — so make sure to settle on correct wording first!
Effects aside, Photoshop also has several other text-related features that you won’t find in Canva. These include:
- anti-aliasing text settings that let you control the ‘sharpness,’ ‘crispness,’ smoothness,’ and ‘strength’ of the edges of your text
- the ability to warp your text across 15 geometric shape options
- a font matching tool that lets you work out which font was used in a design
- the ability to quickly insert sample ‘Lorum ipsum’ text into a design
- a spell checker.
Storage space
When it comes to cloud storage space for your artwork projects, Canva is the more generous platform.
The free Canva plan provides 5GB of storage; Canva Pro increases this to 100GB; Canva Business gives you 500GB; and Canva Enterprise users get 1TB per user.
With Photoshop, the amount of cloud storage you get depends on your plan.
The standalone Photoshop and Creative Cloud All Apps plans include 100GB, while the Photography plan provides 1TB of storage — despite costing roughly the same as the standard Photoshop plan.
You can purchase up to 10TB of extra cloud storage from Adobe, though pricing isn’t clearly advertised. Historically, it’s worked out at around $100 per terabyte per year, which is fairly expensive.
Of course, it’s worth pointing out that because Photoshop is installed on your own computer, you don’t technically need to use cloud storage with it. You can of course just use your own local hard disk space.
Creating videos with Canva and Photoshop
Canva and Photoshop don’t restrict you to making ‘static’ designs — you can use both tools to create and edit simple videos too.
While neither Canva or Photoshop’s video editor are in the same league as dedicated video editing software like Adobe Premiere or Final Cut Pro, they give you a good set of features for creating short video content.
You can use both editors to split and trim video really easily, or create transitions (cross dissolves, fades etc.) between clips.
Photoshop’s video editor is the more technically powerful of the two, however. It lets you adjust things like video frame rate as well as the playback speed of individual clips — tasks you simply can’t perform in Canva.
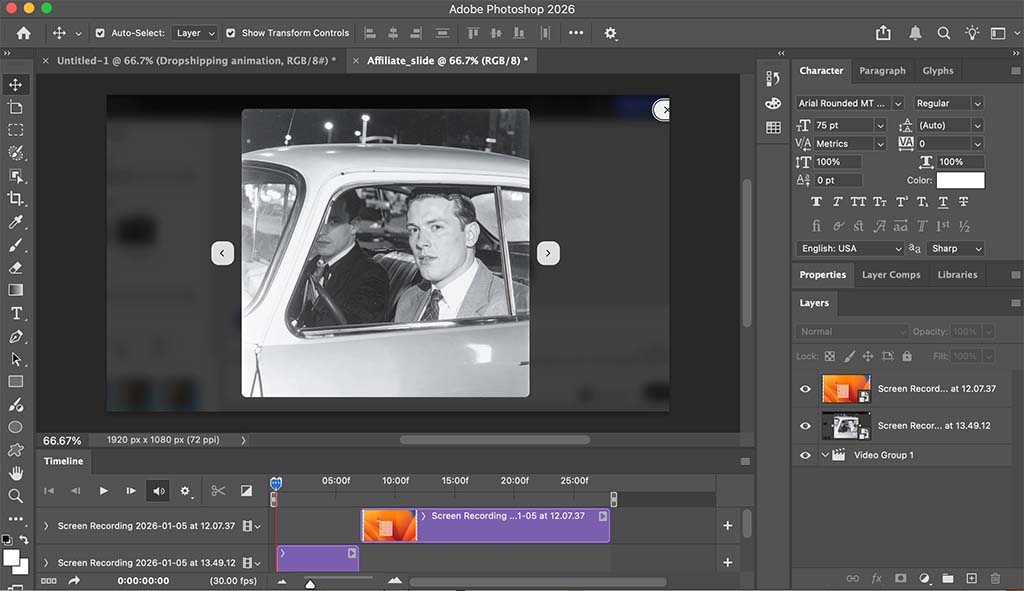
When it comes to exporting your videos, the options in Photoshop are considerably more extensive than in Canva too. While Photoshop lets you export to a wide range of professional video formats, Canva only lets you export to MP4.
However, for common tasks like recording yourself (for presentations etc.), Canva lets you do this much more easily than Photoshop.
To do this in Canva, you simply click on the ‘record yourself’ button in its video editor. This brings you to a ‘studio’ where you can record footage from your webcam, your screen or both. This is a great little feature for creating short tutorial videos or product explainers for your website or online store.
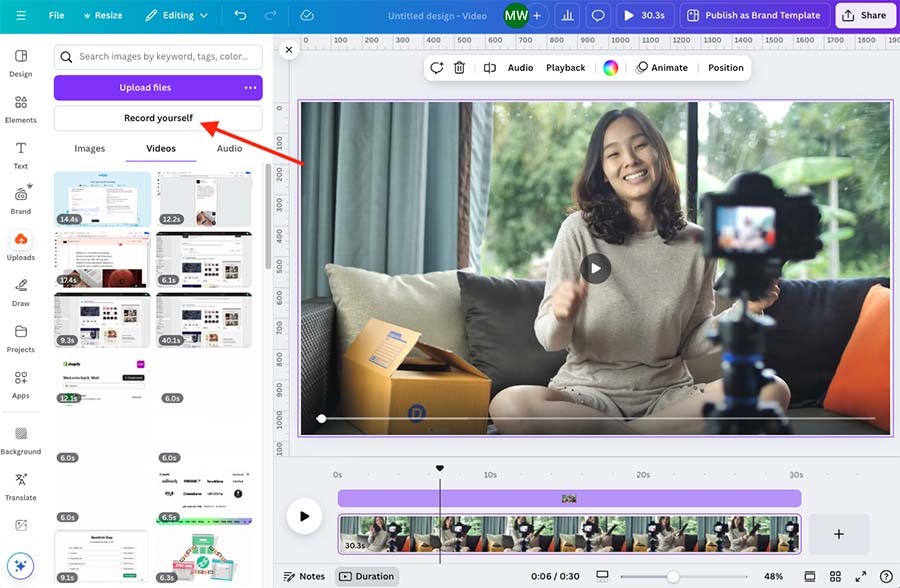
When you’ve finished your recording, Canva automatically adds it to your video timeline for further editing.
To do the same thing in Photoshop, you would have to create your recording outside of the application, and then import it into your project for editing.
The other big advantage of making videos in Canva over doing so in Photoshop is the massive library of royalty-free stock videos you get included with your Canva subscription. Small businesses without the budget for original video footage will love this.
So — as with much else — it’s a win for Photoshop when it comes to the technical side of video editing, but because of its ease-of-use and the stock videos available for it, many users will be happier with the video editing features provided by Canva.
Ensuring brand consistency
A key aspect of designing visuals for any business involves defining and following brand guidelines — a set of rules that govern how that business should be visually represented to its customers.
At the most basic level, this means ensuring that your design work makes use of a company’s logo, typography, and brand colors in a consistent way — and both Canva and Photoshop give you features to help you with this.
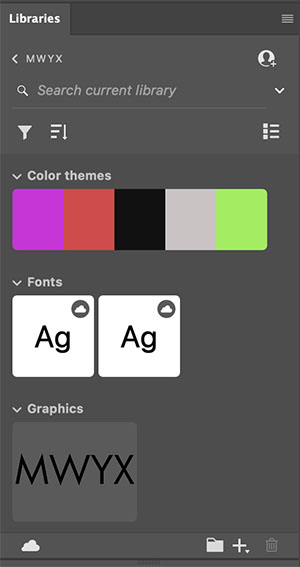
In Canva, you define brand rules using its ‘brand kit’ tool; in Photoshop, you use the ‘Creative Cloud Libraries’ feature.
Canva lets you create 1 brand kit on the free plan, up to 5 on ‘Canva Pro,’ 100 on ‘Canva Business,’ and 1,000 on ‘Canva Enterprise.’
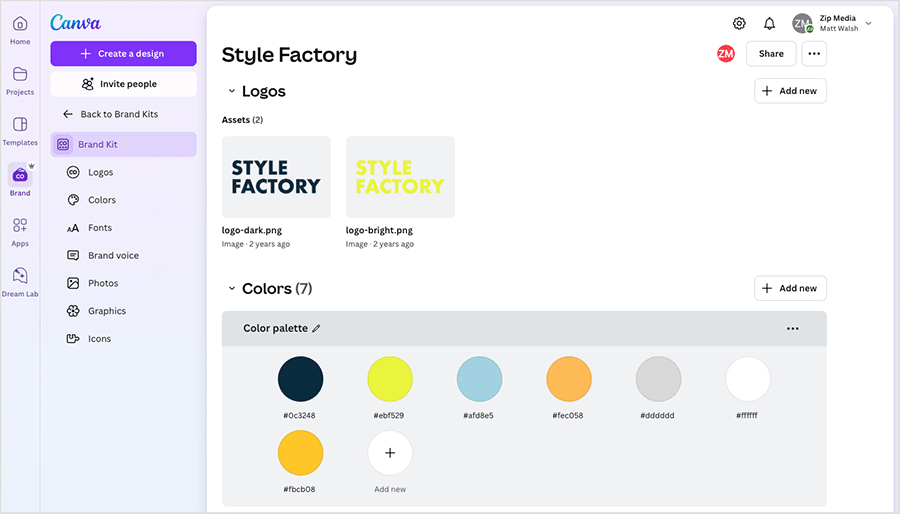
Both tools allow you to add / define:
- your own logo
- your own fonts
- your own color palette
- photos
- graphics.
Once you have set these up in either system, you can apply them easily to your designs.
Managing brand files is slightly better in Photoshop because it lets you create ‘sub-groups’ within an individual library; this lets you add and manage different brand assets for different projects.
Creating designs in bulk
There are many occasions when a designer needs to create multiple — but slightly different — versions of the same design.
For example, you might need to design 100 almost identical business cards for a company, each with different names, phone numbers and email addresses on them.
Both Canva and Photoshop let you use spreadsheet data to avoid the sort of manual editing that this sort of project can entail.
In Canva, this means using its ‘bulk create’ feature, while in Photoshop you use the ‘Image > Variable’ menu command.
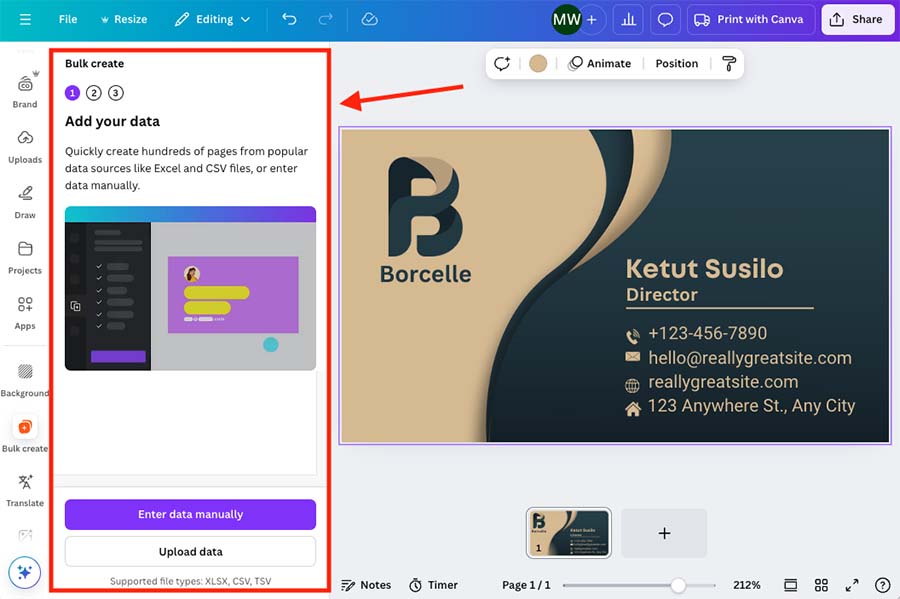
Both these options let you upload a spreadsheet (in CSV format) to populate the content of all your designs.
Alternatively, you can enter the relevant data manually into a grid (see screenshot below for an example of how this works in Canva).
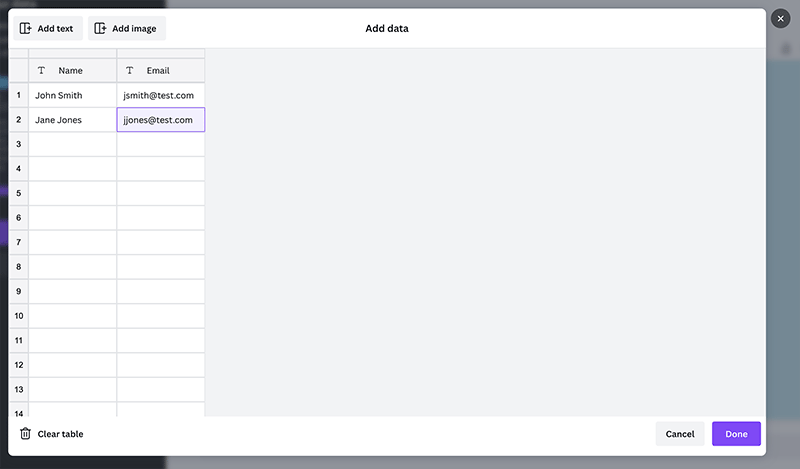
Once you’ve got all your data into either app, you select the different elements of your master design and connect them to the appropriate fields in your spreadsheet.
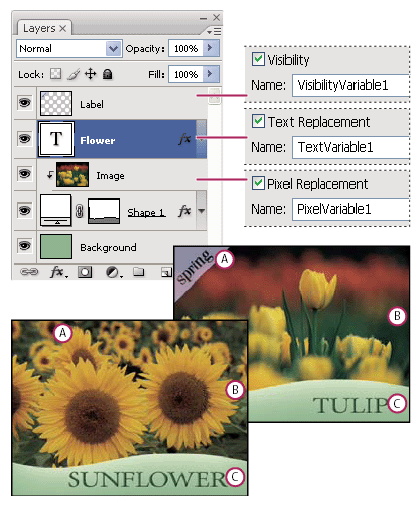
When you click ‘generate’ (Canva) or export ‘Data Sets As Files’ (Photoshop), both tools automatically produce all of your individual design variants, which you can then share, download or print.
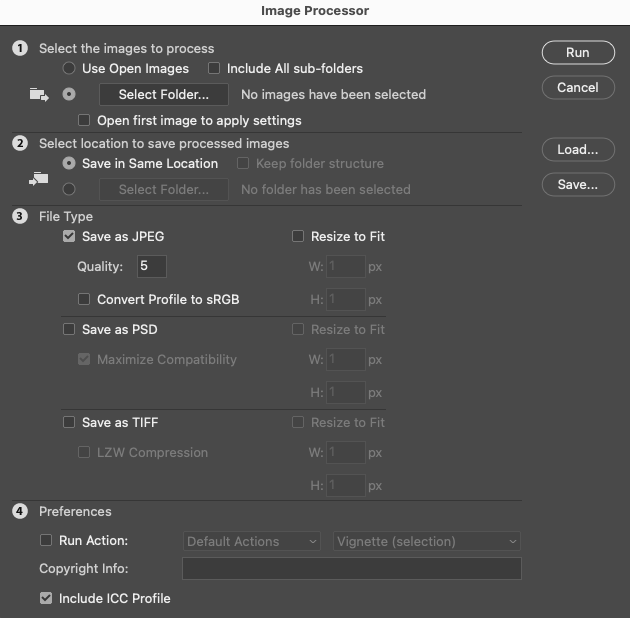
Photoshop goes a bit further than Canva when it comes to other aspects of bulk processing for your designs, however.
It has an ‘image processor’ tool that lets you convert a large number of JPEGs to other file formats all in one go; resize a batch of images to a single aspect ratio; or quickly add copyright and other metadata information to a large number of designs.
And if you find yourself using the same sequence of editing steps in your designs, you also have the option to record this as a Photoshop ‘action’ — this lets you apply these steps to an element of your design in a single click.
So overall, when it comes to bulk-processing tools, the winner is Photoshop.
Organizing work and team collaboration features
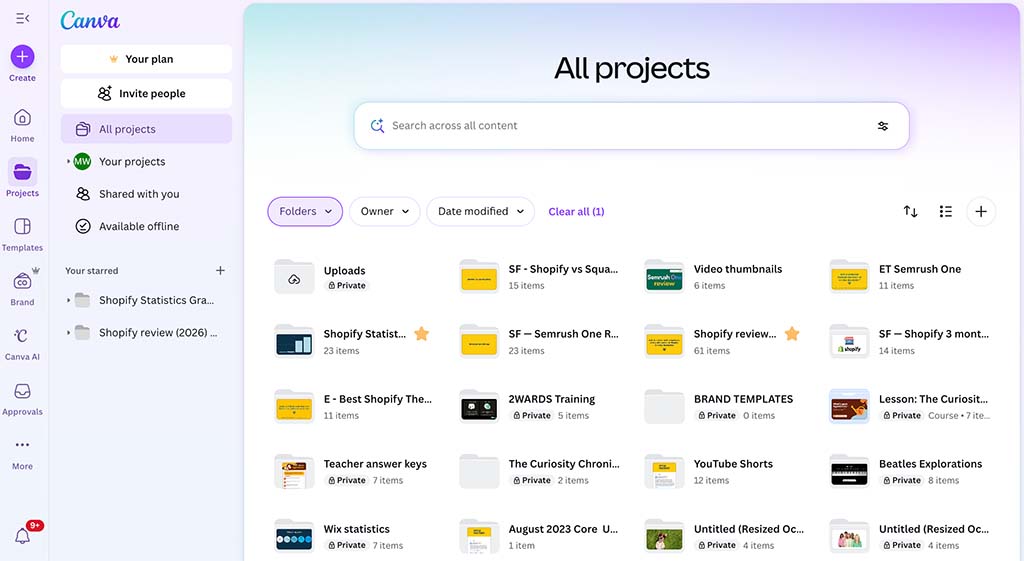
Keeping your work organized in Canva is very straightforward. The ‘Projects’ section lets you create folders that house your designs.
If you’re on a ‘Canva Business’ plan, you can share these folders with other team members, who can work on any files they contain. Team administrators can set various permissions for different users, allowing team members to view, edit or comment on designs (depending on access rights).
In Photoshop, your folders live in your Adobe ‘Cloud Library,’ and if you want to share a file with a collaborator you’ll need to save your Photoshop project to your cloud library before you can access the share settings.
Recently, Photoshop added a ‘Share for review’ function in the Photoshop interface, which allows you to create a shareable link to your Photoshop project to gather comments and feedback on your designs from collaborators or other stakeholders.

But overall, when it comes to collaboration, it’s probably fair to say that because of its more straightforward approach to file sharing, the winner is Canva.
Creating presentations
Canva is also a clear winner over Photoshop when it comes to creating presentations and slideshows.
Although Photoshop provides some very basic features for turning your designs into full-screen PDF presentation documents, if you want to create a Powerpoint document from a Photoshop project, you’ll have to export your files as PDFs and then convert them to PowerPoint format (PPTX) in another app (like Adobe Acrobat).
Canva, by contrast, offers a wealth of customizable presentation templates, and you can export any Canva presentation document to PPTX easily from within Canva’s ‘share’ options.
In addition to creating and saving your presentations, you can use Canva to present your slideshows in front of a live audience. The ‘Present’ button at the top of the Canva interface gives you the option to read your notes while presenting, as well as autoplay or record your presentation performance.

Canva’s presentation tool comes with some nice additional touches for live presenting to an audience. You can use your phone as a remote control while giving a slide presentation, and there’s also a fun set of audio and visual shortcuts for adding drumrolls, confetti and mic drops during it.
You can learn more about using Canva for creating presentations in our full Canva versus PowerPoint comparison.
Try Canva Pro for free – for 30 days
Canva are currently making a 30-day free trial of Canva Pro available to Style Factory readers. This gives you full access to all the Canva Pro features and assets for several weeks, and lets you export all your designs too. Please note that this offer will be available for a limited period only.
Exporting designs
The export options available from Canva and Photoshop underline the ‘Canva for Beginners / Photoshop for Professionals’ thrust of much of this comparison.
Canva offers a range of export formats that is more than adequate for most DIY and newbie designers. It lets you export your design to:
- JPG
- PNG
- SVG (vector graphics file)
- MP4 Video
- GIF
- PPTX (PowerPoint)
(You’ll note that a particular omission in the above list is PSD files: Canva doesn’t support PSD exports. Frustratingly, this means that it’s hard to start a project in Canva and hand it over to a professional designer for completion in Photoshop.)
With Photoshop, you can export your design to all of the file formats listed above (except, as mentioned previously, PPTX) — but you can also make use of a much larger range of other more professional formats, including:
- PSD (Photoshop format)
- PSD (Raw)
- PSD (EPS)
- TIFF
- PSB (Large document format)
- BMP
- H.264 (video)
- JPEG2000 (video)
- Cineon (Kodak film)
- DPX (video)
- WebMP
- TGA
Photoshop also supports newer, more efficient image formats such as AVIF and JPEG XL, which are better suited to high-quality web delivery.
As well as providing a much larger range of export options than Canva, Photoshop offers a huge amount of control over precise settings within each export format — depending on your file type, you can adjust its compression, bit depth, metadata and much else besides.
Adjusting many of the more detailed settings in Photoshop’s export controls requires good technical knowledge of the file types involved — so, if you are relatively new to Photoshop, it is probably advisable to stick to the default export settings until you have done your homework.
Designing websites with Canva and Photoshop
While you can use both Canva and Photoshop to design for screens of all sizes, Canva lets you take web design one step further — it actually lets you create and host fully responsive websites with the platform.
There’s an impressive selection of around 3,000 website templates available from the platform; and you can choose to publish your site to a (free) Canva URL, buy a new domain for it from Canva or map it to a domain you already own.
However, Canva websites are really basic — they’re essentially single-page sites. There are no SEO tools or ecommerce features provided, and users looking to create a professional business website will be much better served by dedicated website builders and ecommerce platforms like Squarespace or Shopify.
That said, if all you want is a simple showcase or resume site, Canva’s website builder is a very handy tool indeed.
Now, as mentioned above, there isn’t an equivalent feature in Photoshop, but there are some features available for making individual website components.
For example, you can copy and paste the various styles of a design into a CSS style sheet for use in a website. Additionally, you can use Photoshop’s ‘slices’ feature to create website elements (icons, animated buttons and photo galleries) that can be exported as HTML files for use in a live website.
But you’re hoping to create a fully-published (albeit simple) website, Canva is the better solution for you.
Non-design tools in Canva that you won’t find in Photoshop
Although Canva’s image manipulation functionality is more basic than Photoshop’s, it’s worth pointing out that the tool comes with a good selection of non-design features that make it much more than an easy-to-use design app.
Some of these extra features include:
- A content planner — a calendar-style planner that lets you connect your social media accounts to Canva and schedule posts for publishing on them.
- ‘Canva Docs’ — a newly released word processing tool that lets you create text documents and use an AI-powered ‘Magic Write’ content generator.
- A ‘Magic Whiteboard’ tool — this provides you with an infinite whiteboard for brainstorming and team collaboration tasks.
- Print services — Canva offers a printing feature that lets you order printed products that you’ve designed with the tool (these include things like business cards, posters and clothing).
- A translation tool — Canva provides a translation tool that lets you translate the text of your designs into more than 100 different languages.
All in all, these extra Canva features make it a very useful app for small businesses and solo creators.
Generative AI tools in Canva and Photoshop
Both Canva and Photoshop have recently introduced a range of AI-powered image generation and editing features.
In Photoshop, these features are powered by Adobe’s ‘Firefly’ software, while Canva’s AI tools form part of its new range of ‘Magic Studio’ features.
These new AI tools in both platforms let you perform a host of editing tasks that were previously unthinkable.
For example, you can use these tools to easily expand your photo’s background via ‘generative expand’ tools, and it is now also extremely easy to erase or replace objects within a photo thanks to AI-powered ‘generative fill’ tools.
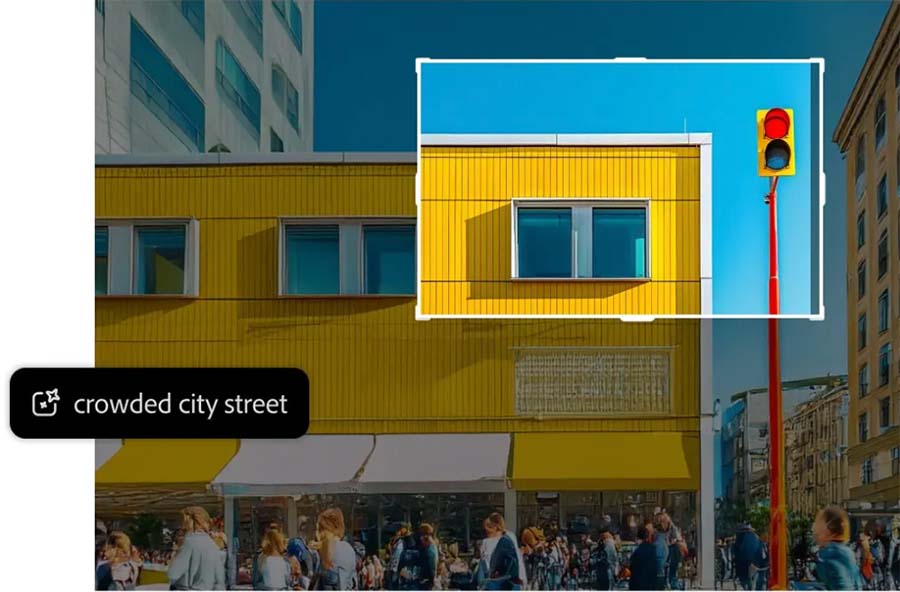
In terms of how well these new AI features work in Canva and Photoshop, we found both platforms to produce very impressive results overall, with very little to differentiate them with regard to the quality of their AI-generated outputs.
You can see a quick demonstration of some of Canva’s AI tools in the video below.
Apps and integrations
You can do a lot of design work with the built-in features of Canva and Photoshop. However, you can also extend both tools’ functionality further by adding extra features via third-party apps and integrations.
Photoshop provides the much larger selection here, with over 2,000 free and paid-for integrations — known as ‘plugins’ — available in the ‘Adobe Exchange Marketplace’. You access these through the ‘Plugins’ menu at the top of the Photoshop interface.
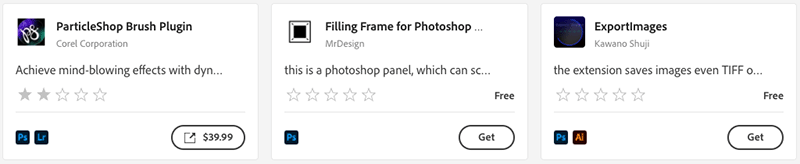
Many of the Photoshop plugins on offer provide specialist photo-editing functionality that will be of interest to professional photographers and designers. For example, there are around 60 plugins alone dedicated to editing and retouching ‘skin tones’ in your photos. Prices for these plugins range from $10 to $80.
There are also quite a few plugins for Photoshop that simplify some of the standard Photoshop controls — for example, tools that make it easier to organize layers or perform color grading on your artwork.
Canva has a much smaller collection of around 940 apps available, most of which are free. These are located in its ‘app directory’, which can be accessed through the ‘Discover app’ tab in the left-hand side of the Canva interface.
Many of the Canva apps on offer let you add special effects and filters to your images, but there are also some useful apps available for connecting Canva to well-known social media platforms (Facebook, Instagram, Pinterest etc.) and marketing platforms (like Mailchimp, LinkedIn and Hubspot).
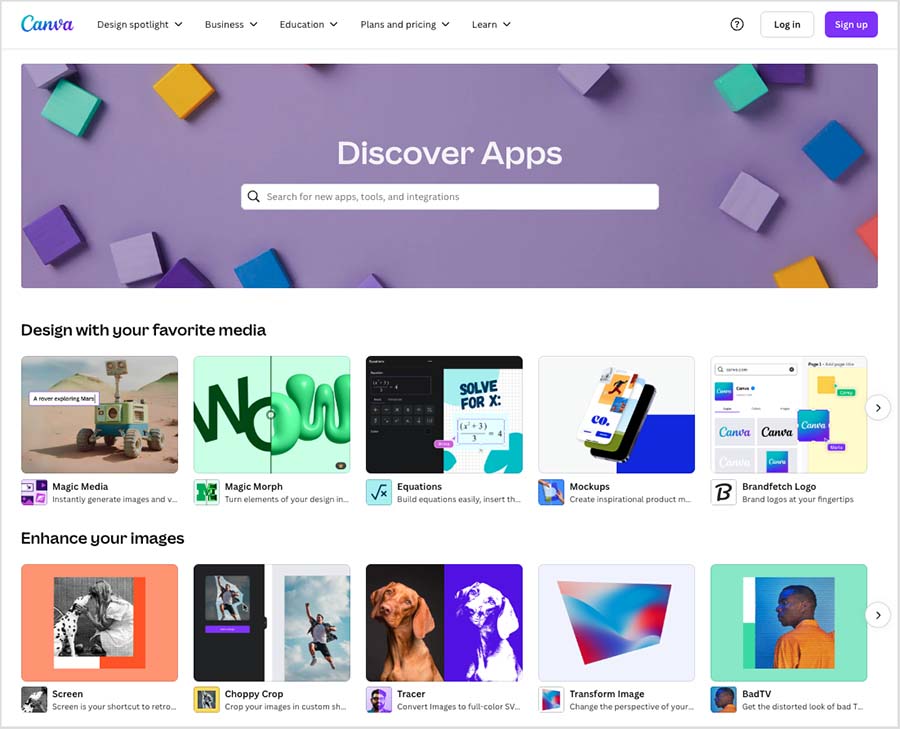
Although there are far fewer apps available for Canva, I much prefer its app directory’s approach to the organization of them.
Canva apps are grouped into different headings — ‘import media,’ discover content,’ photo editing,’ ‘share and publish’ etc. — making it very easy to find a relevant app for your needs.
By contrast, when you’re looking for a Photoshop app in the Adobe Exchange Marketplace, you can only use a general search box to enter phrases in order to find a relevant app for your needs; and with so many apps on offer, this can result in a lot of scrolling to find the most relevant apps.
It would be much better if Photoshop apps — as is the case with other ‘software as a service’ products with large app libraries like Shopify — were fully categorized.
Mobile apps
Canva and Photoshop both provide users with iOS and Android mobile apps that allow you to perform key editing tasks on the go.
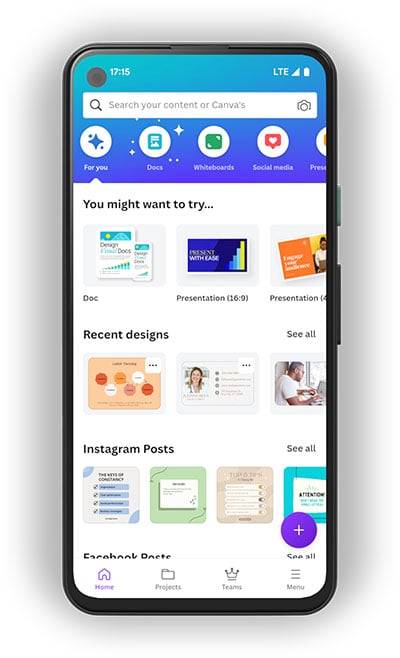
Canva’s mobile app is particularly good. Its interface is basically the same as that of the full version of the product, and makes nearly all of Canva’s artwork creation and editing features available to smartphone users. You can access all of Canva’s design templates and stock assets easily from within the app.
By contrast, the Photoshop app is a much more cut-down affair — it just lets you apply quick edits and adjustments to photos on your phone’s camera roll. Its features are nowhere near as powerful as those of the desktop version of the platform.
User reviews of these apps are generally very positive. Photoshop’s mobile app holds ratings of 4.5 on the Apple App Store and 4.0 on Google Play, reflecting strong feedback from creative professionals and casual users alike. Canva’s mobile app, however, performs even better — earning an impressive 4.9 on the App Store and 4.8 on Google Play, with users frequently praising its ease of use and versatility.
Overall though, because its mobile app is far more functional than the Photoshop equivalent, the winner in this department is Canva.
Languages
Canva and Photoshop both offer a range of ‘account languages’ — meaning that users can set up the interface of each platform to display in their own preferred language.
Canva offers a much more comprehensive range of account languages though — over 130 different languages are catered for, compared to only 26 in Photoshop.
This makes Canva the better option for users who want to access their graphic design software in their native language.
Canva is also the better choice if you are creating designs that need to be translated into multiple languages — it includes a translation tool that lets you easily translate text content into 100+ languages.
‘Canva Free’ users can use this feature to translate up to 50 pages per month; and paid-for Canva account holders can translate a pretty generous 500 pages per month in total.
Customer support
When it comes to getting help from both platforms, Photoshop has the edge. It offers 3 customer support contact methods — phone, Twitter and live chat — while Canva only offers support via email.
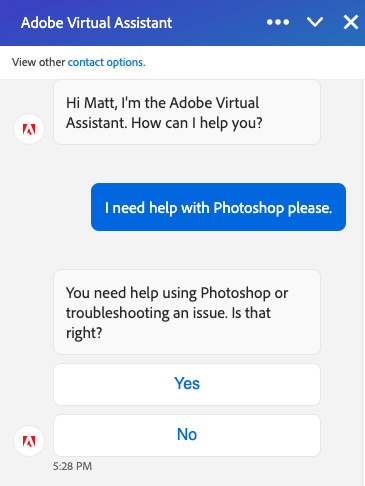
Additionally, Photoshop’s customer service is very prompt — you generally get connected to an agent through Adobe’s live chat support within a minute or two after entering your support issue into Adobe’s ‘virtual assistant’ (pictured below).
With Canva, turnaround times for support will depend on the type of plan you are on. Users on paid-for Canva plans generally receive answers to support queries within 24 hours, but if you are a on a free plan, you may be waiting up to one week to get the support you need.

Finally, both tools provide you with searchable databases full of support materials and tutorials for getting to grips with the features of each platform.
I particularly like Photoshop’s short tutorial courses. There are 200+ free courses available which can be filtered by ‘beginner’ or ‘experienced’ depending on your skill level. Additionally, each tutorial provides detailed ‘how-to’ videos along with sample files that you can import into Photoshop to experiment with.
User reviews
When comparing design platforms, it’s always useful to see how existing users rate their experiences. Independent review sites provide a good snapshot of overall satisfaction — and the scores below highlight how Canva and Photoshop perform according to thousands of reviewers.
| Review site | Canva | Photoshop |
| Capterra | 4.7 (13,133 reviews) | 4.8 (2,417 reviews) |
| G2 | 4.7 (6,550 reviews) | 4.6 (13,136 reviews) |
| GetApp | 4.7 (13,100 reviews) | 4.8 (2,400 reviews) |
| TrustRadius | 9.1 (2,007 reviews) | 9.2 (3,495 reviews) |
| Average user score (out of 5) | 4.66 | 4.70 |
Takeaway: the scores are essentially neck and neck — both Canva and Photoshop enjoy excellent feedback from users, with only the tiniest of gaps between their overall averages.
Canva vs Photoshop: conclusion
Ultimately — and as we’ve seen throughout this comparison — Photoshop provides far more image manipulation options and advanced features than Canva, while Canva offers a broader range of easy-to-use design tools (and some very useful non-design tools) for non-professional designers and businesses.
But which is better for your project?
Well, when it comes to value-for-money, Canva’s very affordable pricing makes it the better option for users on a tight budget. In particular, the ‘Canva Business’ plan is great value, letting your team members enjoy all of Canva’s premium features and assets for a monthly fee of just $20 (or $16.60 per person per month if you opt for an annual subscription).
But price is not the only reason to opt for Canva.
For me, Canva is also be the better choice for anyone who is not a full-time commercial graphic designer or visual creative. There are several reasons for this.
First, Canva is incredibly easy to use — as long as you have the most basic IT skills, you will be able to produce attractive designs with Canva (in a matter of minutes!).
Second, Canva’s library of templates, stock photos and videos is massive. These assets mean you won’t have to create everything from scratch or spend time and money searching for assets outside the platform.
And finally, Canva’s additional features (presentation tools, content planner, website builder etc.) make it an extremely useful bit of kit in the arsenal of any entrepreneur, small business or content creator.
Photoshop is undeniably a better choice for professional designers however — serious photographers, graphic designers, or digital creatives that have already invested in the high-powered design software available through Adobe’s ‘Creative Cloud’ product suite will benefit massively from the huge range of advanced features that Photoshop provides.
As with all our product comparisons, I’ll end by suggesting that you try both products out yourself before purchasing — free trials are available for both tools, and I’d encourage you to make the most of them.
Below you’ll find a summary of the key pros and cons of Canva vs Photoshop — and if you have any queries, do make sure you leave them in the comments section below.
Canva vs Photoshop — pros and cons summary
Advantages of using Canva over Photoshop
- It’s significantly cheaper.
- Canva is much easier to use than Photoshop — depending on how you intend to use it, Photoshop can present you with a steep learning curve.
- No software needs to be installed to create designs with Canva — you just use it in a web browser.
- Its template and stock media libraries provide millions of royalty-free assets that you’ll have to source (and pay for) separately if using Photoshop.
- It’s better for repurposing existing design.
- It provides significantly more storage space than most Photoshop plans.
- Its background removal tool works not just with images, but videos too.
- It’s much better for creating presentations with.
- It lets you create and publish websites (albeit simple ones).
- Canva’s mobile app offers an almost identical range of features to the browser version — Photoshop’s mobile app is fairly basic.
- A totally free version is available, along with a generous 30-day trial of the ‘Canva Pro’ version (note that the latter is available for a limited time only, however).
Advantages of using Photoshop over Canva
- It’s a much more powerful tool for photo manipulation and enhancement.
- Its background removal and other object removal tools are more sophisticated.
- It comes with a much wider range of fonts.
- It lets you edit RAW photos.
- It offers a lot more file export options.
- It integrates with many more apps and plug-ins than Canva.
- If you already use other Adobe apps for creative work, you’ll find that it’s much better fit than Canva.
- The support offering is better than Canva’s.
- It’s an industry standard design app — projects created with it can be adapted or worked on much more easily by professional graphic designers.
Alternatives to Canva and Photoshop
There are plenty of alternatives to Canva and Photoshop available!
In fact, Photoshop’s parent company Adobe recently launched a browser-based app, Adobe Express, that directly competes with Canva.
Unlike Photoshop — and in a similar way to Canva — Adobe Express gives you access to a large range of templates and stock images. The app is similarly priced to Canva and the premium version is available to all Creative Cloud subscribers. You can see how Adobe Express stacks up against Canva in our detailed Adobe Express versus Canva comparison here.
In terms of other browser-based apps, Visme, Kittl and Vista Create are similar graphic design platforms to Canva and allow non-professional designers create visual content easily. You can find out more about these products in our full Visme vs Canva and Canva vs VistaCreate comparisons, as well as our Kittl review and our Kittl vs Canva shootout.
As for alternatives to Photoshop for high-powered photo editing, Affinity Photo and GIMP are two tools that feature many of the same technical editing capabilities as Adobe’s flagship product. Unlike Photoshop however, Affinity Photo can be purchased outright for a one-time fee. And GIMP — which, unlike Photoshop, can be used not just on Macs and PCs but on Linux computers too — is open-source software that is totally free to use.
If the bulk of your design work involves creating presentations, you could also consider Microsoft PowerPoint. This app will be of interest to users of Microsoft products (Word, Excel, Publisher etc.) and it features a much wider range of output options for your presentations than Canva. For more details on Microsoft PowerPoint, check out our Canva versus PowerPoint comparison here.
Finally, if you are mainly interested in designing websites, there are significantly better platforms than Canva and Photoshop available for this purpose — just a few examples include WordPress, Squarespace, Webflow, Wix and Shopify.
More Canva resources from Style Factory
Canva vs Photoshop FAQs
Which is better, Photoshop or Canva?
It entirely depends on your needs. For image manipulation and professional output formats, Photoshop is the clear winner. But for ease-of-use and getting access to a wider range of design tools, Canva is the better option.
How is Canva different from Photoshop?
While Photoshop’s core strength lies in its image and photo editing capabilities, Canva is a multi-purpose tool that lets you create not just visual assets but design presentations, create text content, schedule social media posts and even design simple websites.
Do professionals use Canva?
Canva can definitely be used for professional design work — especially where creating online visual assets is concerned. However, most professional graphic designers will use Adobe Photoshop to create material that is designed to be printed, or for producing work that needs to be output at a very high resolution.
What are the main competitors to Canva and Photoshop?
The main competing products to Canva are Adobe Express, Visme and Vista Create; tools like Affinity Photo and GIMP currently compete with Photoshop.
How we tested these products — and why you can trust this review
We tested Adobe Photoshop and Canva via independent research and, more importantly, hands-on experience of both products.
We regularly use Canva and Photoshop for creating our own visual assets for the Style Factory website and other online assets — and have extensive knowledge of how the tool works. So this comparison is based on creating many design projects from scratch; editing existing ones; and using apps in conjunction with both tools.
And finally, we have a strict honesty policy — while we do make use of affiliate advertising to fund our research and testing, we strive to be 100% impartial in all conclusions.
Update details
This article was updated on January 6, 2026. The following updates were made:
- User numbers for both platforms were updated.
- Product screenshots were updated.
- Subscription pricing for Adobe Stock was updated.
- Stock graphics quantities were updated.
- New file types were added to Photoshop’s export options.
- The user reviews section was updated.
Comments (1)