
In this simple step by step guide, we show you exactly how to add Google Analytics to your Shopify store.
What is Google Analytics 4?
Google Analytics 4 is the latest version of Google’s free analytics tool; it replaces the company’s ‘Universal Analytics’ product, which was in use between 2012 and 1 July 2023.
Google Analytics 4 provides more detailed information about user behavior on your website or online store (particularly where conversions and user journeys are concerned).
But it also gives people visiting your site more protection when it comes to their privacy.
Some of the data Google Analytics 4 gives you includes…
- a real-time overview of your website traffic
- the location of your users
- how users got to your store pages
- what type of device visitors used to access your store
- how long people spend on your store
- what they have added to their baskets.
This is just a small selection of what’s available however; there is a really wide range of reports in the tool, and Google Analytics lets you filter your data and visualize the specific data sets you need. It’s well worth integrating it with your Shopify store, even if you’re happy with the platform’s built-in reporting features — Google Analytics can give you a lot of additional context about your users.
Right, let’s get to it.
How to set up Google Analytics 4 in Shopify
1. Create a Google account
In order to use Google Analytics you need to have a Google account.
(If you already have a Gmail account or a Google Workspace account, you’re all set and can jump ahead to step 2 now.)
If you don’t have any kind of Google account yet, you’ll need to go to the Google account sign-up page.
You simply enter your details into the fields provided and click ‘Next’.

Note that you don’t need a Gmail address to create a Google account. Google gives you the option to use an email address with another provider, such as Yahoo or Outlook.
You’ll then need to provide some additional information to Google, such as your phone number and a recovery email address for your account. You’ll also need to accept Google’s terms of service.
With that done, you’ll be brought to your new Google account page.
2. Set up Analytics and get your tracking code
To set up a Google Analytics account, sign in to Google Analytics.
When you do this, you’ll see a blue ‘Start measuring‘ button in the middle of the Analytics welcome page.
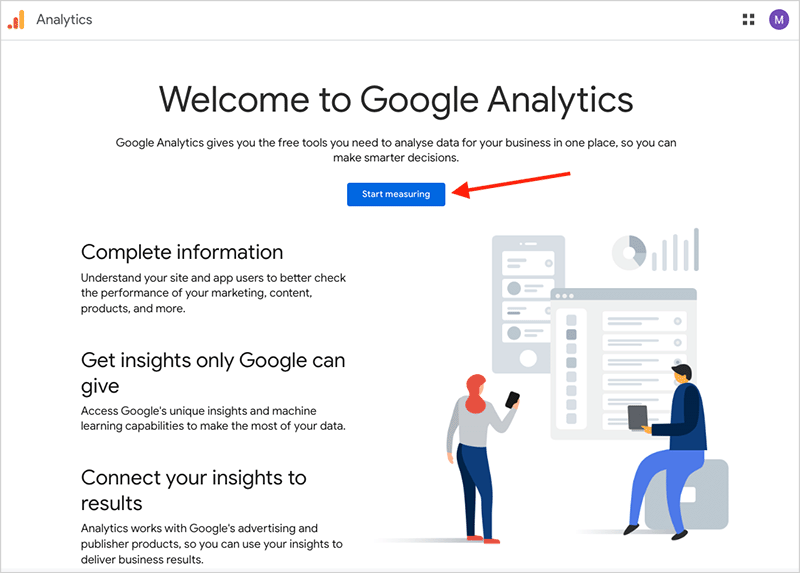
Click on this button.
You’ll then be taken to the Google Analytics account setup screen.
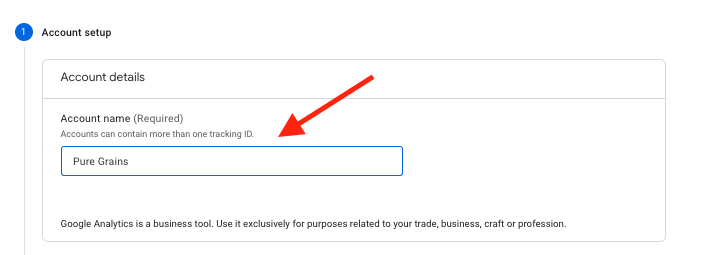
The first thing you need to do is enter an account name for your Google Analytics account. It is usually best to simply go with the name of your business for this.
You can then choose the type of data you wish to share with Google.
Having done that, click ‘Next.’
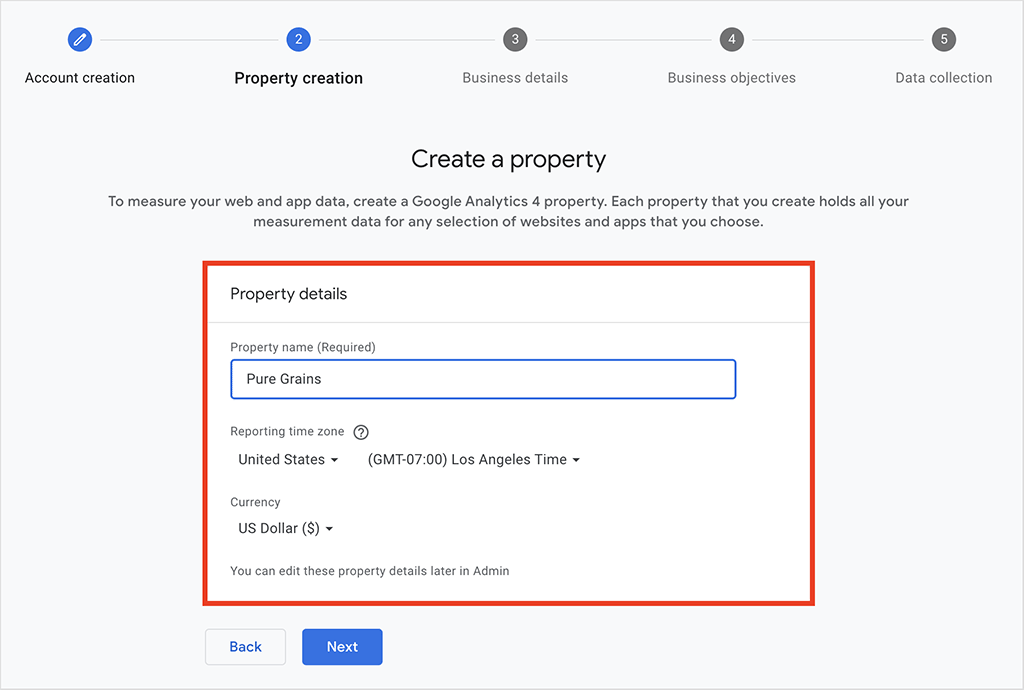
You’ll now see the ‘Property setup‘ section.
Tip: In Google terminology, a ‘property’ is essentially all the data associated with an individual website with a unique URL, for example ‘puregrains.com’. If you have multiple websites for your online business, you can set up multiple properties top to track customer behavior on each one.
(In this post I’ll stick to showing you how to enable Google Analytics tracking on a single Shopify website.)
Enter the name of your business in the ‘property name’ field and choose your preferred time zone and currency. Then, click ‘Next‘.
You now have the option to enter some information about your business, such as your industry, company size and how you intend to use Google Analytics.
(You can skip this step if you wish.)
Next, click ‘Create‘.
At this point you need to accept Google’s terms of service for using Google Analytics.
Make sure that you select your country / region in the top left corner of the panel.
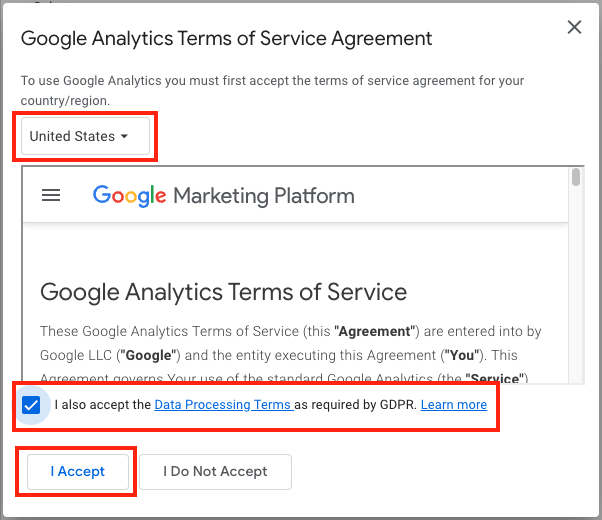
If your business is located in the EU (or some of your customers are located there), you’ll also need to tick the check box beside ‘I also accept the Data Processing Terms as required by GDPR’.
Once you’ve done that, click ‘I Accept‘.
You’ll now be brought to the Admin page of your Google Analytics account for your new property.
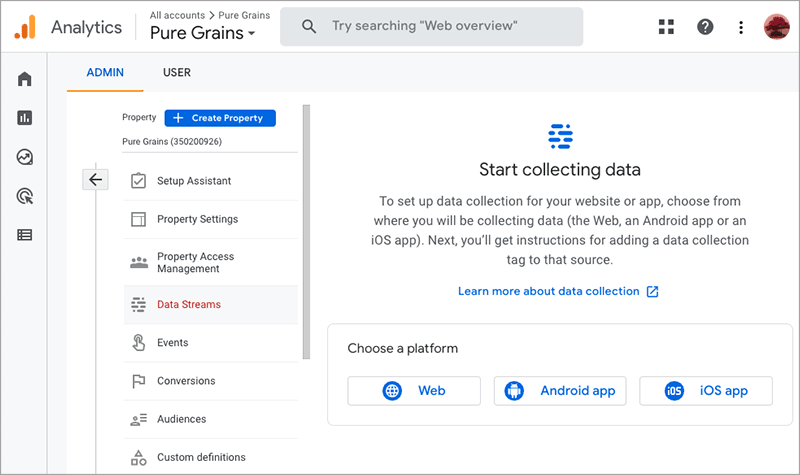
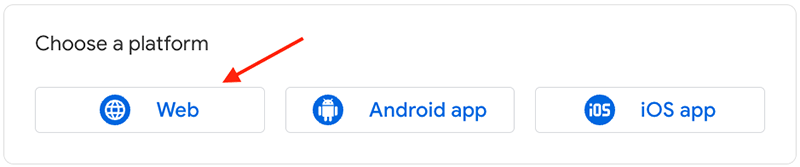
Go to the ‘Choose a platform‘ section, and click on the ‘Web‘ button.
You’ll then see a page that lets you create a ‘data stream’ between Google Analytics and your Shopify store.
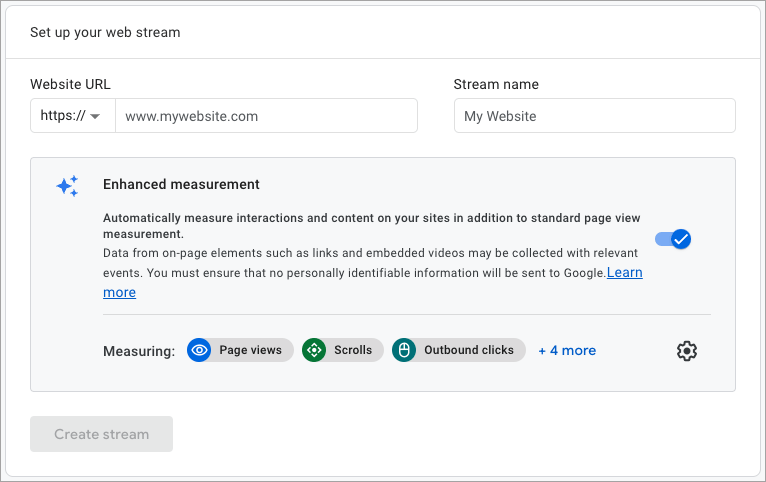
You now need to enter your store’s domain into the ‘website URL‘ field.
Note: in the below example, we’re using a ‘myshopify.com’ domain. However, you will probably be using a custom domain name (yoursitename.com etc.).
Then enter your business name into the ‘Stream name’ box
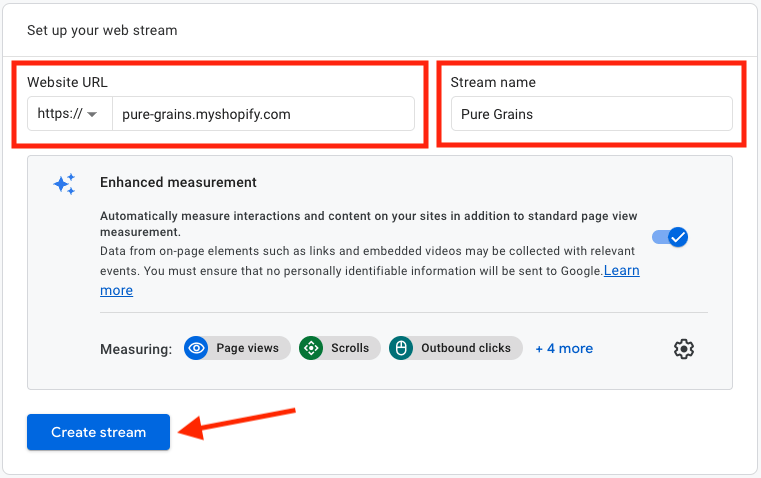
Then click ‘Create stream’.
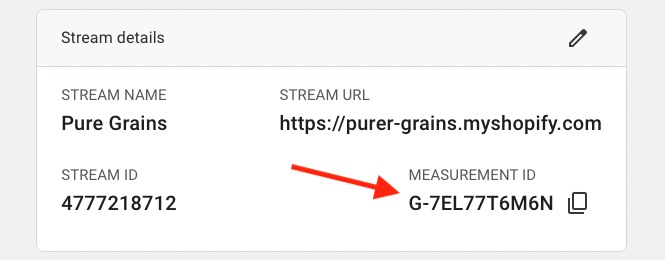
When you create a new stream, make sure you take a note of the stream’s ‘Measurement ID’ because you’ll need this in the next step.
3. Add Google Analytics 4 tags to Shopify
At this point, return to your Shopify Admin and click enter the phrase ‘Google & YouTube’ into the seaarch box at the top of the page.
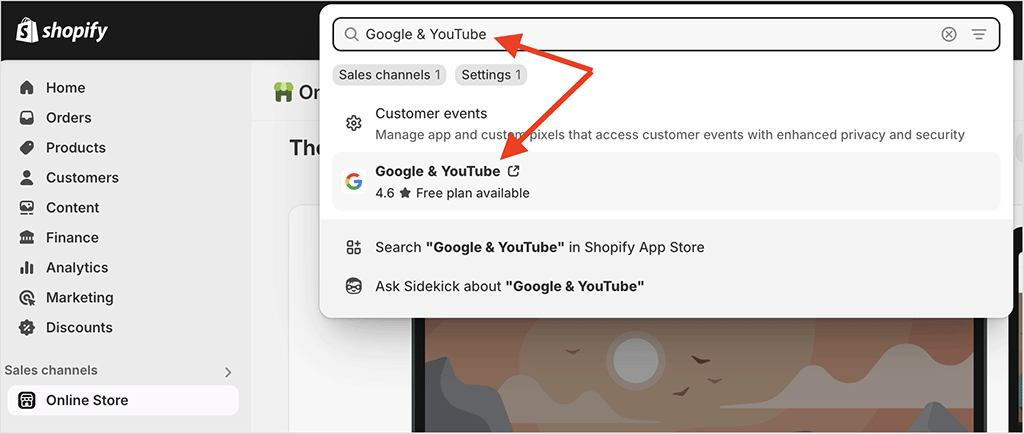
Click on the app in the dropdown results and then click the install button.
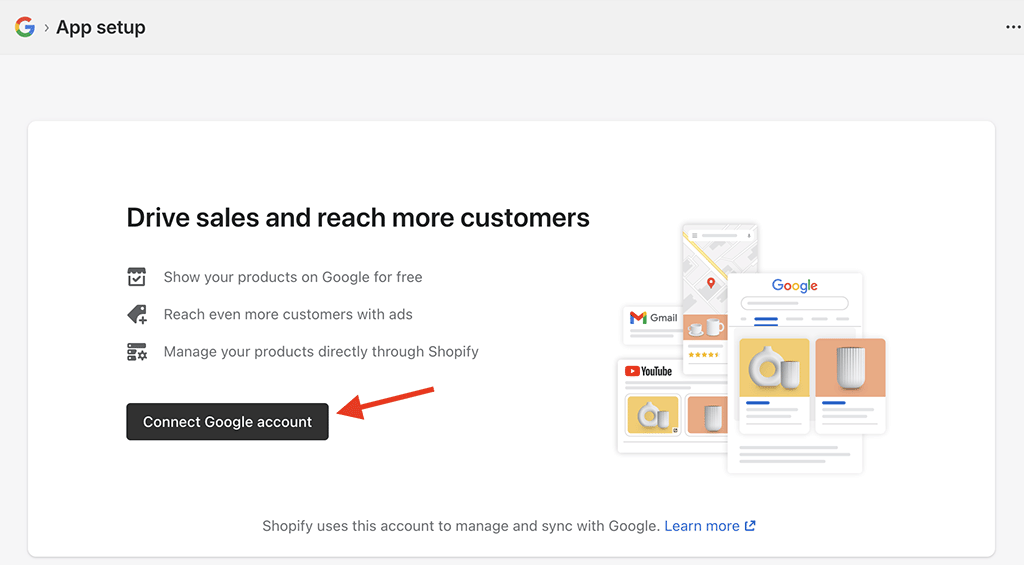
With that installed, click on the ‘Connect Google account’ button and choose the Google account you wish to use in conjunction with your Shopify store.
You’ll now see the option to ‘connect a Google Analytics property’. In the dropdown menu, select the property you just set up over in Google Analytics, making sure that the ‘Measurement ID’ matches the one you made a note of in Google Analytics.
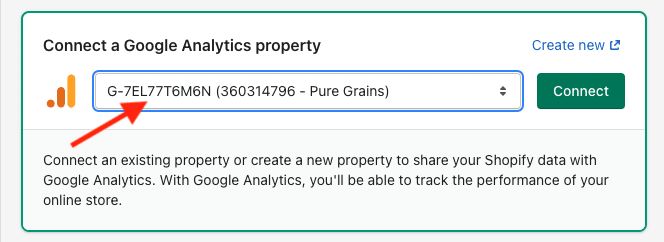
With the correct property selected, click ‘Connect’.
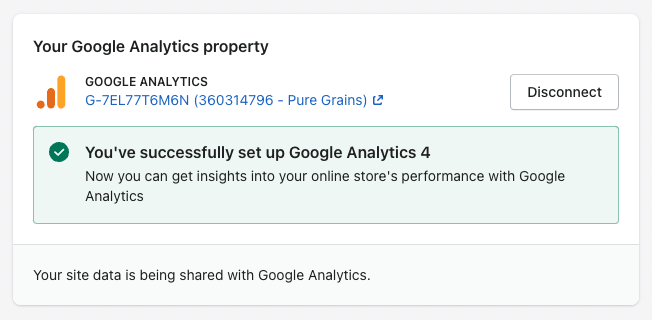
Congratulations — you’ve just enabled Google Analytics on your Shopify store!
But you’re not quite done yet. You’ve still got to…
4. Test that Google Analytics 4 is connected to your Shopify store
Now that you’ve completed all the necessary steps to connect Google Analytics 4 to your Shopify store, it’s time to test that everything is working as it should.
To do this, you can simply enter your store domain name into a web browser.
Browse some of your store pages and interact with your store for a few seconds. This will create some data on your Shopify store that Google Analytics will gather through the connection you have just set up.
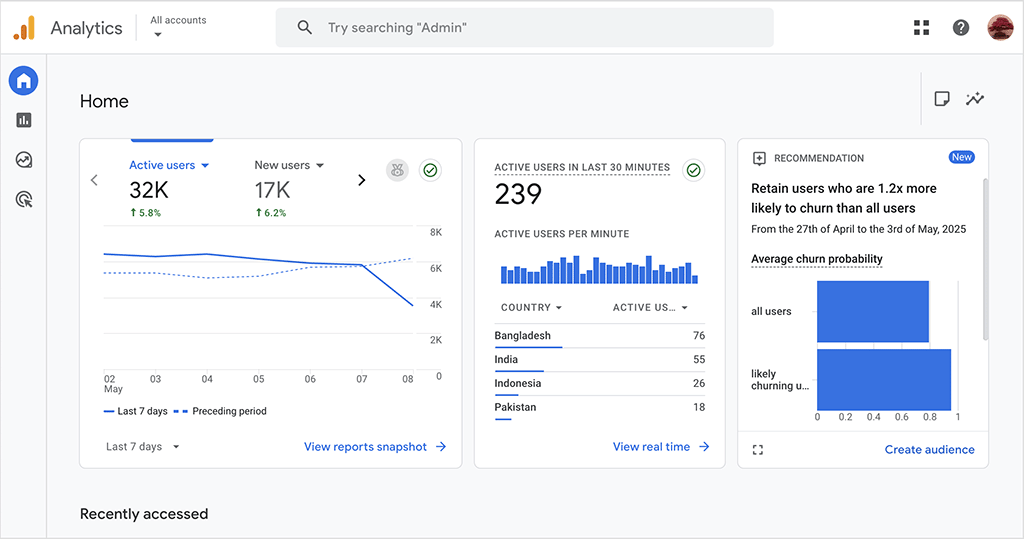
Then, go back to Google Analytics and click on ‘Real-time’ in the Google Analytics menu.
This will show you some information on current store visitors as well as visits in the last 30 minutes.
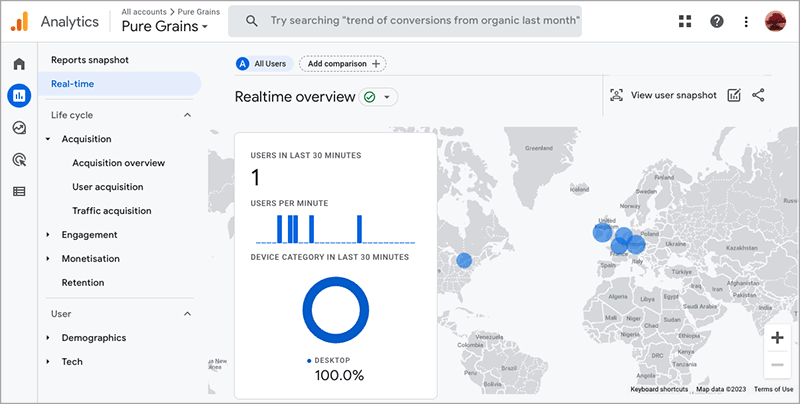
If you see anything like the image above, you’ll know that Google Analytics 4 is now successfully connected to your Shopify store and gathering data on your customers’ behavior across your store’s pages.
And that’s it!
I hope you find this explanation of how to enable Google Analytics on your Shopify store useful.
If you’ve got any questions, please feel free to add them to the comments section below — we read them all and will do our best to help.
While you’re here, download our free ecommerce e-kit
For a limited time, we’re offering our readers some excellent free tools. Sign up free to immediately receive:
- our e-book on how to start a Shopify store
- our online store comparison chart
- a downloadable cheatsheet on how to create an online store
- our SEO, blogging and ‘how to start a business’ cheatsheets
- extended free trials and discount codes for essential business apps
- our latest tips on ecommerce and growing a business
Related reading
- Shopify SEO
- How to change your Shopify store name and URL
- Shopify launch checklist
- How to connect Printful to Shopify
- How to add FAQ schema to your website
- How to make your site more visible in search
- How to increase blog traffic
- How to sell music on Shopify — the essential guide
- How to sell on Shopify without inventory
- 10 free SEO resources
- How to remove ‘Powered by Shopify’ from your store
- How to recover from a Google core update
Update details
This post was updated on 9 May 2025). The following key edits were made:
- A new screenshot of the Google Analytics dashboard was added.
- The section on adding Google Analytics 4 tags to Shopify was changed to reflect changes in the Shopify interface, with new imagery added also.
No comments